
1、为何要用到ant这个工具呢?
Ant做为1种工具已广泛被使用,并且历史悠久。
使用ant的内置命令,可以编译java源文件(javac),运行java文件(java),给class文件打包(jar、war、ear),
也能够创建(mkdir)、删除(del)、拷贝(copy),乃至可使用ant履行sql文件。
由于ant是用xml语言写成的文件,并取默许名为build.xml文件。
所以,今后大家应当在见到名为build.xml文件时知道这是1个ant的文件。
ant 工具后面跟的是任务的名称
ant server 运行了Server类,发布了1个webservice
ant client 调用已发布的webservice
ant clean 清除已生成的class 文件
ant war 将java 项目打成1个war 包
ant deploy -Dtomcat=true 把打成的war 拷贝到tomcat 的webapp 下面去。
ant undeploy -Dtomcat=true; 卸载tomcat 下面的项目..
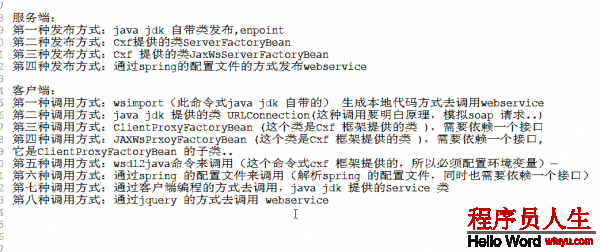
用cxf 框架提供的类发布1个服务
方法1
使用cxf 提供 ServerFactoryBean 来发布webservice
被发布的类当中可以不需要标注webservice 注解,类当中可以不包括有效的方法,
如果没有包括有效的方法.它会提供1个空的服务.
//创建发布服务的类...
ServerFactoryBean bean=new ServerFactoryBean();
bean.setAddress("http://192.168.9.100:8080/server");//服务对外的访问地址
bean.setServiceClass(CxfWebService.class);//设置服务类的接口类型,如果没有接口则为当前类..
bean.setServiceBean(new CxfWebService());//设置服务类的实现
bean.create();//发布服务
有接口的情况
package com.zj.server;

import org.apache.cxf.interceptor.LoggingInInterceptor;
import org.apache.cxf.interceptor.LoggingOutInterceptor;
import org.apache.cxf.jaxws.JaxWsServerFactoryBean;

import cn.itcast.webservice.userService.UserService;
import cn.itcast.webservice.userService.UserServiceImpl;

/**
 *
 * 使用cxf 提供的类 JaxWsServerFactoryBean 来发布1个带接口的webservice ...
 *
 * @ 作者 zhuwu@itcast.cn
 *
 */
public class PublishUserService {

    /**
     * @param args
     */
    public static void main(String[] args) {
        //创建发布服务的 类...
        JaxWsServerFactoryBean  bean=new JaxWsServerFactoryBean();
        //设置对外的访问地址
        bean.setAddress("http://10.129.69.114:7418/userService");
        bean.setServiceClass(UserService.class);//设置接口类型...
        bean.setServiceBean(new UserServiceImpl());//设置接口的实现类...
        //我们可以在发布服务的时候添加消息拦截器
        //拦截客户端往服务端 发送的要求的消息
        bean.getInInterceptors().add(new LoggingInInterceptor());
        //拦截服务端往客户端返回的消息...
        bean.getOutInterceptors().add(new LoggingOutInterceptor());

        bean.create();
    }

}
第2种发布方式
使用cxf 框架提供的类 jaxWsServerFactoryBean 发布webService
jaxWsServerFactoryBean 是 ServerFactoryBean 的子类...

jaxWsServerFactoryBean bean=new jaxWsServerFactoryBean();
bean.setAddress("http://192.168.9.100:8080/server");//服务对外的访问地址
bean.setServiceClass(CxfWebService.class);//设置服务类的接口类型,如果没有接口则为当前类..
bean.setServiceBean(new CxfWebService());//设置服务类的实现
bean.create();//发布服务方法1
用cxf 框架提供的类调用服务.. (需要依赖1个接口,通过wsimport 生成的代码当中获得…)
//创建调用webservice 服务的类...
ClientProxyFactoryBean bean=new ClientProxyFactoryBean();
bean.setAddress("http://192.168.9.100:8080/server");//设置访问地址...
bean.setServiceClass(CxfWebServicePortType.class);//设置服务的接口...
//创建接口类型...
CxfWebServicePortType cxfWebServicePortType=(CxfWebServicePortType) bean.create();
cxfWebServicePortType.sayHello();
方法2
使用cxf 提供类 JaxWsProxyFactoryBean 来调用 webservice 的服务端…….
JaxWsProxyFactoryBean 是  ClientProxyFactoryBean  的子类...
//创建调用服务的类...
JaxWsProxyFactoryBean bean=new JaxWsProxyFactoryBean();
//设置访问地址
bean.setAddress("http://192.168.9.100:7418/userService");
//设置接口类型...
bean.setServiceClass(UserService.class);
UserService us=(UserService) bean.create();

String data=us.getUserById(1);

System.out.println(data);服务端: 客户端
ServerFactoryBean ————ClientProxyFactoryBean
JaxWsServerFactoryBean—————-JaxWsProxyFactoryBean
JaxWsServerFactoryBean 可以发布soap1.2 版本的协议….发布服务的时候,
我们最好被发布的服务类要面向接口编程..
命令:wsdl2java
wsdl2java 是cxf 框架给我们提供的命令,这个命令的作用与wsimport 类似...
拦截器:
cxf 框架中提供了拦截器的机制,我们可以通过拦截器获得到客户端与服务端进行交互的时候的数据格式
    //创建发布服务的 类...
    JaxWsServerFactoryBean  bean=new JaxWsServerFactoryBean();
    //设置对外的访问地址
    bean.setAddress("http://192.168.9.100:7418/userService");
    bean.setServiceClass(UserService.class);//设置接口类型...
    bean.setServiceBean(new UserServiceImpl());//设置接口的实现类...
    //我们可以在发布服务的时候添加消息拦截器
    //拦截客户端往服务端 发送的要求的消息
    bean.getInInterceptors().add(new LoggingInInterceptor());
    //拦截服务端往客户端返回的消息...
    bean.getOutInterceptors().add(new LoggingOutInterceptor());
bean.create();由于cxf的web项目已集成了Spring所以,cxf的服务类都是在spring的配置文件中完成的。以下是步骤:
服务器实现了
发布1个不带接口的webservice
<!-- 1,id,2,服务对外的访问地址,3,提供服务的实现类..  -->
<jaxws:endpoint id="helloService" address="/helloService" implementor="cn.itcast.cxf.spring.HelloService"></jaxws:endpoint>
发布1个带接口的webservice
<?xml version="1.0" encoding="UTF⑻"?>
<web-app version="2.5" xmlns="http://java.sun.com/xml/ns/javaee"
    xmlns:xsi="http://www.w3.org/2001/XMLSchema-instance"
    xsi:schemaLocation="http://java.sun.com/xml/ns/javaee
    http://java.sun.com/xml/ns/javaee/web-app_2_5.xsd">
    <!--
    通过服务器启动,解析spring 的配置,可以解决第1次访问
    org.apache.cxf.transport.servlet.CXFServlet
    去解析spring配置,致使第1次访问webservice 慢的问题...
     -->
    <listener>
        <listener-class>org.springframework.web.context.ContextLoaderListener</listener-class>
    </listener>
    <context-param>
        <param-name>contextConfigLocation</param-name>
        <param-value>/WEB-INF/cxf-servlet.xml</param-value>
    </context-param>


    <servlet>
        <!-- 配置cxf -->
        <servlet-name>cxf</servlet-name>
        <servlet-class>org.apache.cxf.transport.servlet.CXFServlet</servlet-class>
        <init-param>
            <!-- 配置Spring的配置文件 -->
            <param-name>config-location</param-name>
            <!-- 通过servlet 去解析此配置文件,会致使第1次访问很慢,
        这是1个spring 的配置文件,
             -->
            <param-value>/WEB-INF/cxf-servlet.xml</param-value>
            <!--
                cxf 的启动原理,依托servlet
                首先我们在阅读器上面敲地址栏,进入到
                org.apache.cxf.transport.servlet.CXFServlet
                履行init 方法  /WEB-INF/cxf-servlet.xml 配置文件
                //request
                String basePath=http://localhost:8080/cxfspringweb/ws/helloService

                JaxWsServerFactoryBean bean=new JaxWsServerFactoryBean();
                bean.setAddress(basePath);//设置服务的访问地址
                bean.setServerClass(cn.itcast.cxf.spring.HelloService.class);//设置服务的接口
                bean.setServerBean(Class.for("cn.itcast.cxf.spring.HelloService").newInstance());//设置服务的接口实现类
                bean.create();//发布
             -->

        </init-param>
    </servlet>
    <servlet-mapping>
        <servlet-name>cxf</servlet-name>
        <url-pattern>/ws/*</url-pattern>
    </servlet-mapping>
    <welcome-file-list>
        <welcome-file>index.jsp</welcome-file>
    </welcome-file-list>
</web-app>
<?xml version="1.0" encoding="UTF⑻"?>
<beans xmlns="http://www.springframework.org/schema/beans"
    xmlns:xsi="http://www.w3.org/2001/XMLSchema-instance" xmlns:jaxws="http://cxf.apache.org/jaxws"
    xmlns:jaxrs="http://cxf.apache.org/jaxrs" xmlns:cxf="http://cxf.apache.org/core"
    xsi:schemaLocation="http://www.springframework.org/schema/beans
          http://www.springframework.org/schema/beans/spring-beans⑶.0.xsd
            http://cxf.apache.org/jaxrs http://cxf.apache.org/schemas/jaxrs.xsd
            http://cxf.apache.org/jaxws http://cxf.apache.org/schemas/jaxws.xsd
            http://cxf.apache.org/core http://cxf.apache.org/schemas/core.xsd">
        <!-- 引入CXF Bean定义以下,初期的版本中使用 -->
        <import resource="classpath:META-INF/cxf/cxf.xml" />
        <import resource="classpath:META-INF/cxf/cxf-extension-soap.xml" />
        <import resource="classpath:META-INF/cxf/cxf-servlet.xml" />
        <!-- 通过配置文件的方式发布1个不带接口的webservice -->
        <!-- 1,id,2,服务对外的访问地址,3,提供服务的实现类..  -->
        <jaxws:endpoint id="helloService" address="/helloService" implementor="cn.itcast.cxf.spring.HelloService"></jaxws:endpoint>
        <!-- 通过此配置发布1个带接口的webservice  -->
        <!--
            1,id
            2,服务对外的访问地址
            3,接口的类型

         -->

        <jaxws:server id="makeCallService" address="/makeCallService" serviceClass="cn.itcast.cxf.spring.call.CallService">
            <jaxws:serviceBean>
            <!-- 接口的实现类... -->
                <bean class="cn.itcast.cxf.spring.call.CallServiceImpl"></bean>
            </jaxws:serviceBean>
            <!-- 通过配置文件的方式添加拦截器。。。 -->
            <!-- 添加要求的消息拦截器 -->
            <jaxws:inInterceptors>
                <bean class="org.apache.cxf.interceptor.LoggingInInterceptor"></bean>
            </jaxws:inInterceptors>

            <!-- 添加响应的消息拦截器.. -->
            <jaxws:outInterceptors>
                 <bean class="org.apache.cxf.interceptor.LoggingOutInterceptor"></bean>
            </jaxws:outInterceptors>

        </jaxws:server>


</beans>spring配置文件
<?xml version="1.0" encoding="UTF⑻"?>
<beans xmlns="http://www.springframework.org/schema/beans"
    xmlns:xsi="http://www.w3.org/2001/XMLSchema-instance" xmlns:jaxws="http://cxf.apache.org/jaxws"
    xmlns:jaxrs="http://cxf.apache.org/jaxrs" xmlns:cxf="http://cxf.apache.org/core"
    xsi:schemaLocation="http://www.springframework.org/schema/beans
          http://www.springframework.org/schema/beans/spring-beans⑶.0.xsd
            http://cxf.apache.org/jaxrs http://cxf.apache.org/schemas/jaxrs.xsd
            http://cxf.apache.org/jaxws http://cxf.apache.org/schemas/jaxws.xsd
            http://cxf.apache.org/core http://cxf.apache.org/schemas/core.xsd">
        <!-- 引入CXF Bean定义以下,初期的版本中使用 -->
        <import resource="classpath:META-INF/cxf/cxf.xml" />
        <import resource="classpath:META-INF/cxf/cxf-extension-soap.xml" />
        <import resource="classpath:META-INF/cxf/cxf-servlet.xml" />
        <!--
            1,id,通过id 获得到bean
        2,访问webservice 的服务的地址
        3,需要依赖接口类型
         -->
        <jaxws:client id="itcast" address="http://localhost:8080/cxfspringweb/ws/makeCallService" serviceClass="cn.itcast.cxf.spring.call.CallService"></jaxws:client>

</beans>package cn.itcast.spring.client;
import org.springframework.context.ApplicationContext;
import org.springframework.context.support.ClassPathXmlApplicationContext;
import cn.itcast.cxf.spring.call.CallService;
/**
*
* 通过配置文件的方式调用webservice,
* 同时也需要依赖1个接口....
*
* @ 作者 zhuwu@itcast.cn
*
*/
public class SpringClientInvoke {
/**
* @param args
*/
public static void main(String[] args) {
//解析spring配置文件
ApplicationContext context=new ClassPathXmlApplicationContext("bean.xml");
//通过getBean 拿到接口 的实例对象...
CallService callService=
(CallService) context.getBean("itcast");
boolean flag=callService.makeCaller("zj");
System.out.println(flag);
}
}<%@ page language="java" contentType="text/html; charset=UTF⑻"
pageEncoding="UTF⑻"%>
<%
String path = request.getContextPath();
String basePath = request.getScheme()+"://"+request.getServerName()+":"+request.getServerPort()+path+"/";
System.out.println(basePath);
%>
<!DOCTYPE html PUBLIC "-//W3C//DTD HTML 4.01 Transitional//EN" "http://www.w3.org/TR/html4/loose.dtd">
<html>
<head>
<base href="<%=basePath%>">
<title>My JSP 'index.jsp' starting page</title>
<meta http-equiv="pragma" content="no-cache">
<meta http-equiv="cache-control" content="no-cache">
<meta http-equiv="expires" content="0">
<meta http-equiv="keywords" content="keyword1,keyword2,keyword3">
<meta http-equiv="description" content="This is my page">
<script type="text/javascript" src="js/jquery⑴.6.2.js"></script>
<script type="text/javascript">
/**
ajax 的xmlHttpRequest 对象可以发送1个http 要求
我们可以把服务端需要的xml 格式的数据传送到服务端。
摹拟soap 要求。
**/
var itcast;
itcast={
sendMessage:function(){
var data='<soapenv:Envelope xmlns:soapenv="http://schemas.xmlsoap.org/soap/envelope/" xmlns:q0="http://call.spring.cxf.itcast.cn/" xmlns:xsd="http://www.w3.org/2001/XMLSchema" xmlns:xsi="http://www.w3.org/2001/XMLSchema-instance">';
data+='<soapenv:Body><q0:makeCaller><arg0>itcast</arg0></q0:makeCaller></soapenv:Body></soapenv:Envelope>';
$.ajax({
url: "ws/makeCallService",
data:data,
contentType:'text/xml;charset=utf⑻',
type:"POST",
dataType:"xml",
success: function(data, textStatus, jqXHR){
var text=$(data).find("return").text();
$(".message").html(text);
// $(".message").show(3000);
$(".message").slideDown(3000);
}
});
},
hide:function(){
$(".message").slideUp(3000);
}
}
</script>
</head>
<body>
<input type="button" value="显示" onclick="itcast.sendMessage()"/>
<input type="button" value="隐藏" onclick="itcast.hide()"/>
<div class="message" style="border-width: 4xp;border-style: solid;border-color: red;width: 400px;height: 400px;display: none;">
</div>
</body>
</html>通过js来访问webservice有两种不同的情势
1、通过SOAP协议进行访问。
发送的全部是XML数据,且必须是POST要求。
2、通过HTTP的get/post方式进行访问。
此种情况又分成不同的情势,此种情况必要在cxf下发布。由于jdk1.6基本的发布不支持Http,soap1.2。
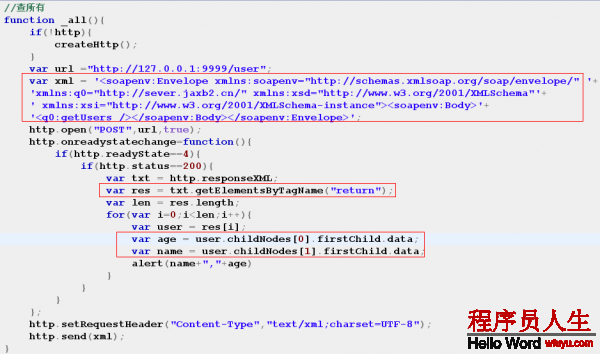
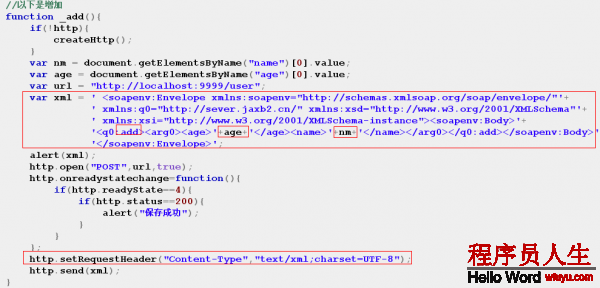
1、发送和接收XML数据。
JS1直存在跨域访问的问题
目前的jQuery不支持跨域访问。如果要进行访问必须使用jQuery的jsonp数据情势。
但原始的ajax可以通过get/post方式跨域访问http上的资源。
以下是通过jaxb发布的webservice。并通过js实现访问webService.
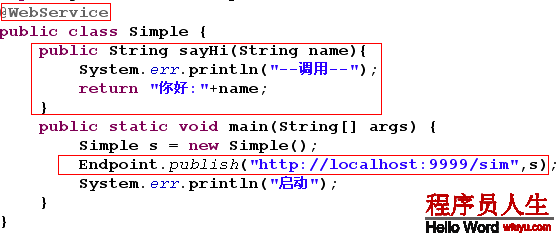
第1步:书写webService的服务:
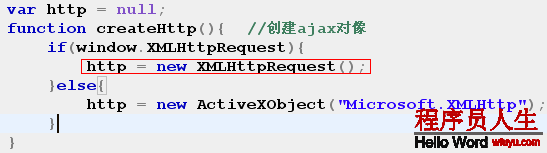
第2步:创建XMLHttpRequest对像:
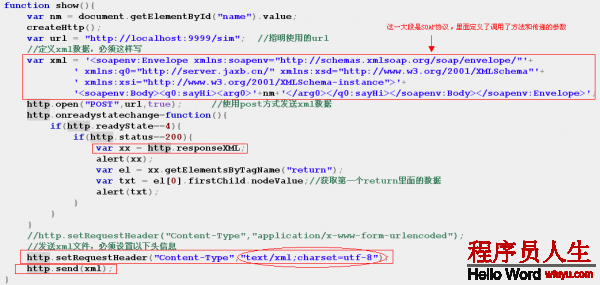
第3步:想法获得SOAP协议的文本,并在JS中做为发出的XML数据
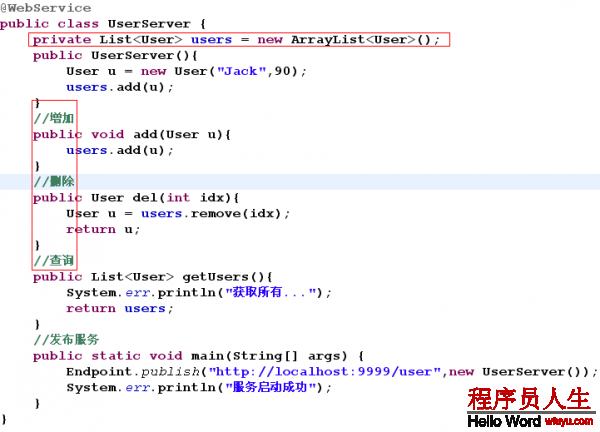
CRUD-Server:
CRUD-Client:
散布与接收webService的方法

程序员人生,我编程,我富裕,记住wfuyu网,php教程,php学习,php手册,CMS模版制作
声明:本站大部分内容是作者原创,少部分收集于互联网供大家一起学习,原版权很多不明,如有侵权请联系本站,谢谢!
粤ICP备14040726号-1 2015-2020 程序员人生 版权所有


