您当前位置:
首页 >
php开源 >
php教程 > PHP+JavaScript+HTML实现上传PDF和浏览PDF课件
PHP+JavaScript+HTML实现上传PDF和浏览PDF课件
来源:程序员人生 发布时间:2015-03-31 07:54:43 阅读次数:3478次
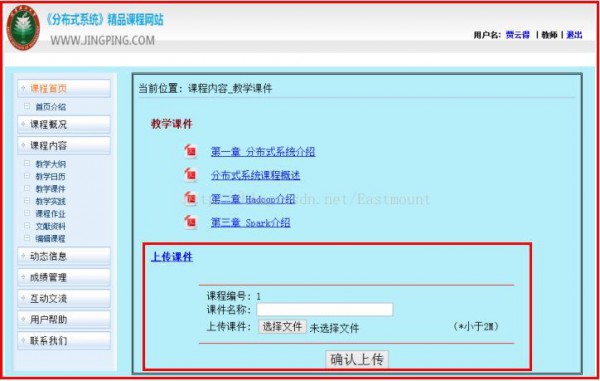
在寒假简单制作PHP网站时,需要实现在线阅读PDF和上传PDF的简单功能,下面就简单介绍下该功能。实现效果以下图所示:
1.当用户登录后,点击“上传课件”超链接可以实现隐藏和显示上传table的功能;
2.当用户选择上传的课件后,PDF上传至本地网页文件夹下,同时插入数据库;
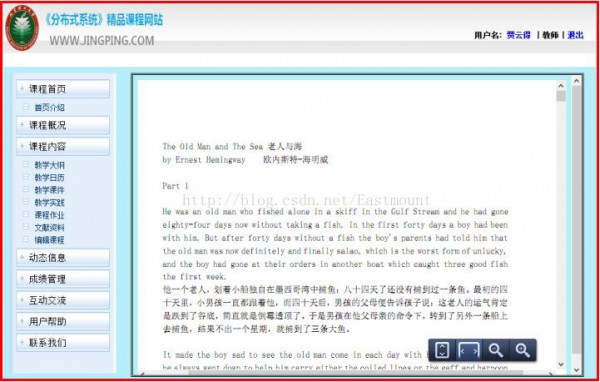
3.当点击相干PDF教学课件后,可以实现在线阅读功能。
网站布局参考:PHP网站使用JavaScript和Iframe简单实现部份刷新效果
1. 隐藏/显示table
首先介绍如何通过JavaScript实现点击超链接实现隐藏和显示Table或DIV的效果,代码以下所示:
<html>
<head>
<meta http-equiv="Content-Type" content="text/html; charset=utf⑻">
<style type="text/css">
/* 这个链接改变色彩 */
a.one:link {color: #0000ff}
a.one:visited {color: #0000ff}
a.one:hover {color: #ffcc00}
</style>
</head>
<script language="JavaScript">
function change(el) {
whichEl = document.getElementById(el) //取得指定ID值的对象
if (whichEl.style.display == 'none') { //block是默许值为显示,none为隐藏
whichEl.style.display = 'block';
} else {
whichEl.style.display = 'none';
}
return;
}
</script>
<body>
<TABLE cellSpacing=0 cellPadding=2 width="95%" align=center border=0>
<TR>
<TD align=left width=120 style="COLOR: #880000;font-weight:bold;">
<a href="#" class="one" onclick=change("operate")> 上传课件 </a></TD></TR>
</TABLE>
<form action="upload.php" method="post" enctype="multipart/form-data">
<TABLE id="operate" cellSpacing=0 cellPadding=0 width="80%" align=right border=0 style="DISPLAY: none">
<tr>
<td colspan="3"><hr width="90%" size="1" color="#FF0000"></td>
</tr>
<TR>
<td width="80"><div align="right">课程编号: </div></td>
<td><?php echo $_SESSION['courseid']; ?></td>
<td></td>
</TR>
<TR>
<td width="120"><div align="right">课件名称: </div></td>
<td width="250"><input type="text" name="kjname" id="kjname" value="" style=width:165pt; maxlength="50"/></td>
<td></td>
</TR>
<TR>
<td ><div align="right">上传课件: </div></td>
<td><input type="file" name="myfile" value="" style='font-size:16px'/>(*小于2M)</td>
</TR>
<TR height=4>
<TD colspan="3"></TD>
</TR>
<tr>
<td colspan="3"><hr width="90%" size="1" color="#FF0000"></td>
</tr>
<tr>
<td colspan="3" align="middle"><div align="middle">
<input type="submit" style='font-size:22px' name="submit" value="确认上传"/>
</div></td>
</tr>
</TABLE>
</form>
</body>
</html>
其中核心代码是通过<script language="JavaScript">..</script>定义JavaScript函数,设置style.display属性none隐藏、block显示;同时在超链接中调用该函数实现如上图所示的效果。代码以下:
<script language="JavaScript">
function change(el) {
whichEl =document.getElementById(el)
if (whichEl.style.display == 'none') { //block为显示,none为隐藏
whichEl.style.display =
'block';
} else {
whichEl.style.display
= 'none';
}
return;
}
</script>
<a href="#" class="one"onclick=change("operate")>
上传课件 </a>
<TABLEid="operate" align=right
border=0style="DISPLAY: none">//初始隐藏
同时在超链接中我通过设置style属性,当点击、移动到超链接上显示的色彩不同。在超链接中通过<a class="one">便可实现。代码以下:
<style type="text/css">
/* 这个链接改变色彩 */
a.one:link {color: #0000ff}
a.one:visited {color: #0000ff}
a.one:hover {color: #ffcc00}
</style>
<a href="#" class="one" onclick=change("operate")>
上传课件 </a>
显示效果以下图所示:
2. 显示PDF在HTML网页中
显示PDF是通过超链接跳转的,这也是我前面PHP值传递中讲述过的方法。其核心代码main_right3⑶.php以下:
<TABLE cellSpacing=0 cellPadding=2 width="90%" align=right border=0>
<?php
//获得课件信息
$hgi=new HttpPostInf();
$result=$hgi->doquery('2',"select * from Courseware_PDF where CP_Cid='".$cid."';");
$dj=json_decode($result,true);
$jcount=count($dj);
for($i=0; $i<$jcount; $i++){
?>
<TR height=10>
<TD></TD></TR>
<TR>
<TD width=40><IMG src="../images/pdf⑵4.png"></TD>
<TD>
<A href="main_right3⑶-content.php?id=<?php echo $dj[$i]['CP_PDFurl'] ?>"
class="one" target="rightFrame"><?php echo $dj[$i]['CP_Cwname'];?></A>
</TD>
<TD></TD>
</TR>
<?php
}
?>
<TR height=20><TD></TD></TR>
</TABLE>
其中里面嵌套的PHP代码是连接数据库里面的数据,其中数据库是通过新浪SAE搭建的,PDF存储的是URL,你既可以连接本地的地址也可连接云盘上的地址。以下图所示:

其中实例化类new HttpPostInf在httppost.php中,主要是后台通讯处理。代码以下:
<?php
header("Content-Type: text/html; charset=utf⑻");
class HttpPostInf{
function __construct(){ //无参构造函数
}
function doquery($type , $sql){ //网路通讯函数
$data = array ('sqlType' => $type , 'sqlExe' => $sql);
$data = http_build_query($data);
$opts = array ('http' => array ('method' => 'POST','header'=> "Content-type: application/x-www-form-urlencoded
" ."Content-Length: " . strlen($data) . "
",'content' => $data));
$context = stream_context_create($opts);
$html = file_get_contents('http://courseweb.sinaapp.com/courseweb.php', false, $context);
return $html;
}
}
?>
通过下面代码便可实现跳转到main_right3⑶-content.php显示相应php,而传递的id参数整数你点击的PDF超链接对应的数据库课件URL地址。
<A href="main_right3⑶-content.php?id=<?php echo $dj[$i]['CP_PDFurl'] ?>"
class="one" target="rightFrame">
下面是main_right3⑶-content.php代码显示PDF,这是通过HTML5实现的。
<?php
header("Content-Type: text/html; charset=utf⑻");
//include ("saestorage.class.php");
//echo $_GET['id'];
?>
<!DOCTYPE HTML>
<html>
<body>
<embed width=100% height=100% fullscreen=yes src="<?php echo $_GET['id'];?>" />
</body>
</html>
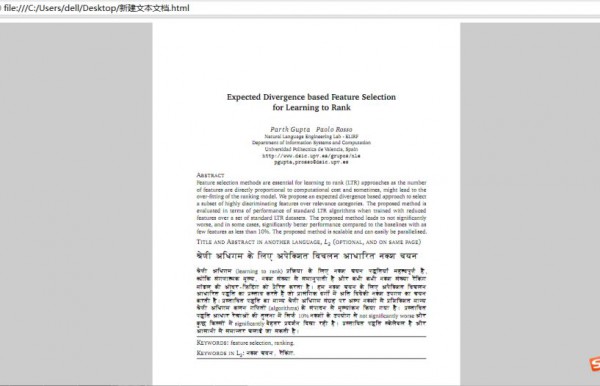
下图是显示我们的云盘中PDF的例子:
<html>
<body>
<embed width=100% height=100% fullscreen=yes
src="http://courseweb-coursewebpdf.stor.sinaapp.com/Expected%20Divergence%20based%20Feature%20Selection.pdf" />
</body>
</html>
你通过上面代码可以显示以下图所示的在线PDF效果。
一样本地的网址为src="http://localhost:8080/CourseStudy/pdf/iCoot.pdf"便可显示,其中文件夹为安装的Apache路径“F:xampphtdocsCourseStudypdf”,其中CourseStudy是我这个项目的文件名。
3. PHP上传PDF
PHP上传PDF代码以下,通过Form中定义属性enctype="multipart/form-data",同时上传到action="upload.php"该路径下进行处理,提交方法采取POST方法。而选择文件的是input定义type="file"便可。main_right3⑶.php代码上传部份以下:
<form action="upload.php" method="post" enctype="multipart/form-data">
<TABLE id="operate" cellSpacing=0 cellPadding=0 width="80%" align=right border=0 style="DISPLAY: none">
<tr>
<td colspan="3"><hr width="90%" size="1" color="#FF0000"></td>
</tr>
<TR>
<td width="80"><div align="right">课程编号: </div></td>
<td><?php echo $_SESSION['courseid']; ?></td>
<td></td>
</TR>
<TR>
<td width="120"><div align="right">课件名称: </div></td>
<td width="250"><input type="text" name="kjname" id="kjname" value="" style=width:165pt; maxlength="50"/></td>
<td></td>
</TR>
<TR>
<td ><div align="right">上传课件: </div></td>
<td><input type="file" name="myfile" value="" style='font-size:16px'/>(*小于2M)</td>
</TR>
<TR height=4>
<TD colspan="3">
</TD>
</TR>
<tr>
<td colspan="3"><hr width="90%" size="1" color="#FF0000"></td>
</tr>
<tr>
<td colspan="3" align="middle"><div align="middle">
<input type="submit" style='font-size:22px' name="submit" value="确认上传"/>
</div></td>
</tr>
</TABLE>
</form>
而上传文件upload.php代码以下,主要是通过<input type="file" name="myfile"中myfile对应上传的文件PDF属性,并判断是不是是PDF文件。
bool move_uploaded_file ( string filename, string destination) 上传文件名filename到指定路径destination
代码中我是上传到项目中pdf文件夹下,同时以当前时间命名;后面是插入数据库课件表的操作。
$_FILES['myfile']['name']是指被上传文件的名称
$_FILES['myfile']['type']是指被上传文件的类型,此时为"application/pdf"
$_FILES['myfile']['size']是指被上传文件的大小,单位为字节(B)
$_FILES['myfile']['tmp_name'] 是指被上传文件存在服务器中的临时副本文件名称,文件被移动到指定目录后临文件将被自动消毁。
参考: http://blog.csdn.net/wer1234s/article/details/7845018
<?php
header("Content-Type: text/html; charset=utf⑻");
include ("../database/human.php");
include ("../database/course.php");
session_start();
if($_POST)
{
$file_name= $_FILES['myfile']['name'] ;
$tmp_name = $_FILES['myfile']['tmp_name'];
if ($_FILES['myfile']['type'] != "application/pdf") {
echo "<p>请上传 PDF 格式的文件.</p>";
}
else {
if(is_uploaded_file($tmp_name)) {
//upload file
$dest_dir='pdf'; //上传文件的路径
$name=$dest_dir.'/'.time().".pdf";
$time = time();
$result=move_uploaded_file($tmp_name,$name);
if($result==1) {
echo "<p>成功上传</p>";
$path="http://localhost:8080/CourseStudy/teacher/".$name;
//echo $path;
//插入数据
$sql = "INSERT INTO Courseware_PDF (CP_Cno,CP_Cid,CP_Cwname,CP_PDFurl) ";
$sql .= "VALUES ('".$time."','".$_SESSION['courseid']."','".$_POST['kjname']."','".$path."');";
echo $sql;
$hgi=new HttpPostInf();
$result=$hgi->doquery('1',$sql);
header('Location:main_right3⑶.php');
}
}
else {
echo "<p>上传文件失败</p>";
}
}
}
?>
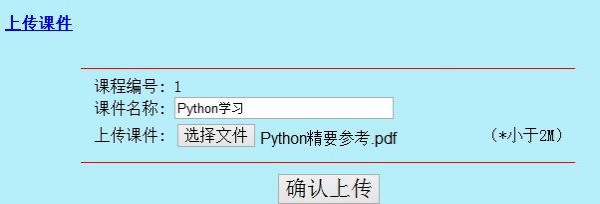
以下图所示,选择PDF并上传的运行结果,同时文件上传至文件夹为安装的Apache路径“F:xampphtdocsCourseStudypdf”路径下。
最后希望文章对你有所帮助,由于这些知识都是环环相扣的,所以单独讲述不太易懂,我也是尽我自己的最大努力写这几篇文章,可能文章效果不是很好,也存在着很多不足的地方。但请海涵,还是希望你能发现文章中对你有用的知识吧!最后记念下自己写的第100篇博客,两年时间感谢自己~期待更长
(By:Eastmount 2015⑶⑹ 深夜3点 http://blog.csdn.net/eastmount/)
生活不易,码农辛苦
如果您觉得本网站对您的学习有所帮助,可以手机扫描二维码进行捐赠

------分隔线----------------------------
------分隔线----------------------------


