
该文同时发布在[ceph中国社区],署名为Thomas
在Openstack中创建云主机,首先得有镜像,而Glance模块提供镜像服务功能,包括:镜像的发现、检索及存储等,主要包括:glance-api和glance-registery两个服务,分别负责镜像的存储和元数据管理。下面基于源码,分析下镜像的上传进程。
先通过glance CLI上传镜像,来直观的了解下镜像上传的进程:
# glance --debug image-create --file centos-7.0-x64-20g.qcow2 --disk-format raw --container-format bare --visibility public通过在命令行中开启--debug,我们可以发现,上传镜像进程中glance CLI会发送以下3个不同的要求:


那这3个要求分别干了甚么事呢? 下面我们来逐一分解。
通过glance/api/v2/router.py.API中定义的路由映照,我们知道上述的第1个要求由glance/api/v2/schemas.py.Controller.image方法处理,以下:
#路由映照,代码节选
#完全的函数实现,请参考glance/api/v2/router.py.API.__init__
def __init__(self, mapper):
    #从/etc/glance/schema-image.json文件加载用户定义属性
    custom_image_properties = images.load_custom_properties()
    #创建glance/api/v2/schemas.py.Controller实例
    schemas_resource =
            schemas.create_resource(custom_image_properties)
    #定义路由映照:
    #curl -X GET /schemas/image  -> shemas_resource.image
    mapper.connect('/schemas/image',
                       controller=schemas_resource,
                       action='image',
                       conditions={'method': ['GET']})

#glance/api/v2/schemas.py.Controller.image
"""返回1个镜像属性字典,结构以下:
[
    'name': image,
    'properties':xxx
    'additionalProperties':xxx
    'definitions':xxx
    'required':xxx
    'links':xxx
]
"""字典值请看下面的分析进程
def image(self, req):
return self.image_schema.raw()self.image_schema在glance/api/v2/schemas.py.Controller.__init__方法中初始化:
def __init__(self, custom_image_properties=None):
self.image_schema = images.get_schema(custom_image_properties)它进1步调用glance/api/v2/images.py.ImagesController.get_schema方法:
def get_schema(custom_properties=None):
    #镜像的基本属性(是1个字典):id,name,status等的定义及描写,
    #通过glance CLI上传镜像成功后,这些字段信息会显示在shell界面上
    properties = get_base_properties()
    """1个包括3个元素的字典列表,像是名字映照束缚
     [
        {'rel': 'self', 'href': '{self}'},
        {'rel': 'enclosure', 'href': '{file}'},
        {'rel': 'describedby', 'href': '{schema}'},
    ]
    """
    links = _get_base_links()
    #根据配置/etc/glance/glance-api.conf决定是生成
    #PermissiveSchema(默许)还是Schema,区分是PermissiveSchema
    #多设置了links参数
    if CONF.allow_additional_image_properties:
        schema = glance.schema.PermissiveSchema('image', properties, links)
    else:
        schema = glance.schema.Schema('image', properties)

    #合并用户自定义属性
    #属性合并很简单:先得到两个属性集的交集,然后判断交集的值是不是冲突
    #如果值冲突,则抛异常,否则就合并数据集
    if custom_properties:
        for property_value in custom_properties.values():
            property_value['is_base'] = False
        schema.merge_properties(custom_properties)
return schema最后来看看raw方法,实现很简单:调用父类的Schema返回镜像属性字典,同时更新additionalProperties属性,然后将属性字典返回给调用者
#glance/schema.py.PermissiveSchema
 def raw(self):
     raw = super(PermissiveSchema, self).raw()
     raw['additionalProperties'] = {'type': 'string'}
     return raw

#glance/schema.py.Schema
def raw(self):
    raw = {
        'name': self.name,
        'properties': self.properties,
        'additionalProperties': False,
    }
    if self.definitions:
        raw['definitions'] = self.definitions
    if self.required:
        raw['required'] = self.required
    if self.links:
        raw['links'] = self.links
     return raw
小结:第1个要求获得了镜像所支持的属性字典定义,下面就该根据这些信息来验证用户输入参数了。
下面来分析第2个要求的处理进程,根据上述的--debug日志和路由映照,我们知道该要求由glance/api/v2/images.py.ImagesController.create方法处理:
 @utils.mutating
 def create(self, req, image, extra_properties, tags):
     """函数实现比较简洁,调用`gateway`的方法分别创建`image_factory`
     和`image_repo`,后面的try{ }except代码块中,分别调用两个对象的
     `new_image`方法进行1系列的校验和`add`方法添加数据库条目,最后返
     `image`对象给调用者;`gateway`在`ImagesController.__init__`方
     法中初始化,是1个`glance/gateway.py.Gateway`实例,其他对象的
     实例化也简单明了,在这里不再表述。根据我们前述的glance CLI命令,
     输入的参数值以下:
     req:是1个Request对象,包括该次要求的要求信息
     image: 是1个字典,包括该次要求的属性,以下:
     {
         'container_format': u'bare',
         'disk_format': u'raw',
         'visibility': u'public'
     }
     extra_properties: 扩大属性字典,这里为空
     tags:标签,这里为空
     """
     image_factory =
         self.gateway.get_image_factory(req.context)
     image_repo = self.gateway.get_repo(req.context)

     #这里省略了,try{ }except异常处理

     #实现用户认证,策略检查,参数检查等,具体请看下面的分析
     image =
     image_factory.new_image(extra_properties=extra_properties,
                                            tags=tags, **image)
     #进1步实现相干的检查,发送消息通知并记录数据
     image_repo.add(image)

return image接着来看看get_image_factory方法:
def get_image_factory(self, context):
    """根据下面的代码实现,可以发现各对象间建立了1个调用链条:
    返回最外层的对象给调用者,调用时逐级调用内部的方法完成相干的操作,
    到达最里层对象后,又顺着调用链逐级返回。其实,后面的`get_repo`方法
    也是采取类似的实现,下面的分析中不再赘述。另外`self.store_api`,
    `self.store_utils`,`self.db_api`等在`__init__`方法中实例化
    进程很直接,这里就不再分析了。
    """
    image_factory = glance.domain.ImageFactory()
    store_image_factory = glance.location.ImageFactoryProxy(
                image_factory, context, self.store_api,
                                        self.store_utils)
    quota_image_factory = glance.quota.ImageFactoryProxy(
                store_image_factory, context, self.db_api,
                                        self.store_utils)
    policy_image_factory = policy.ImageFactoryProxy(
                quota_image_factory, context, self.policy)
    notifier_image_factory = glance.notifier.ImageFactoryProxy(
                policy_image_factory, context, self.notifier)
    #用户可以通过`/etc/glance/glance-api.conf中的
    #property_protection_file`选项配置属性策略,默许为disabled
    if property_utils.is_property_protection_enabled():
        property_rules =
                    property_utils.PropertyRules(self.policy)
        pif = property_protections.ProtectedImageFactoryProxy(
                               notifier_image_factory, context,
                                                property_rules)
        authorized_image_factory =
                            authorization.ImageFactoryProxy(
                                                pif, context)
    else:
        authorized_image_factory =
                            authorization.ImageFactoryProxy(
                               notifier_image_factory, context)
   return authorized_image_factory
根据上面的分析,我画了下面的类图:
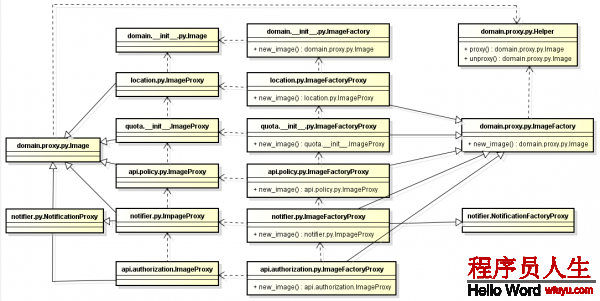
可以看到*ImageFactoryProxy类都继承自glance/domain/proxy.py.ImageFactory,通过类名也能够猜出它的功能:镜像工厂,那就是用来创建封装镜像对象的;各个子类也分别实现:权限检查、消息通知、策略检查、配额检查等。
另外各个*ImageFactoryProxy类都依赖于*ImageProxy类。而各*ImageProxy类都继承自glance/domain/proxy.py.Image,该类描写的是镜像的属性信息,包括:name,image_id, status等。各*ImageProxy类是对Image的扩大。
各个类的关系弄清楚下了,下面来看看new_image的实现:
#最外层的image_factory = #glance/api/authorization.py.ImageFactoryProxy, 作为调用入口
image =
     image_factory.new_image(extra_properties=extra_properties,
tags=tags, **image)为更直观的展现new_image的调用链,请看下面的序列图:
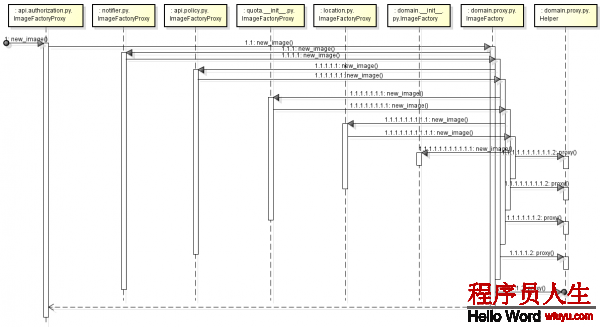
序列图中省略了各个
ImageFactoryProxy.new_image方法中的其他处理进程。
可以看到new_image调用从最左侧的
glance/api/authorization.py/ImageFactoryProxy1直到最深处(右数第3)的glance/domain/__init__.py/ImageFactory,它返回1个domain/__init__.py.Image对象,然后开始逐层往回
(location.py/ImageFactoryProxy到authorization.py/ImageFactoryProxy)调用
glance/domain/proxy.py/Helper.proxy方法,最后的结果是:返回1个经过各个*ImageProxy层层封装的Image对象,如所示(从里到外):
`__init__.py/Image` <- `location.py/ImagePorxy` <- ...... <- `authoriaztion.py/ImageProxy`看到上面Image的封装进程,有无觉得很像TCP/IP协议栈的封包进程呢!有封包,就1定会有解包,下面1起来看看:
""""add方法就是用来解包和封包的
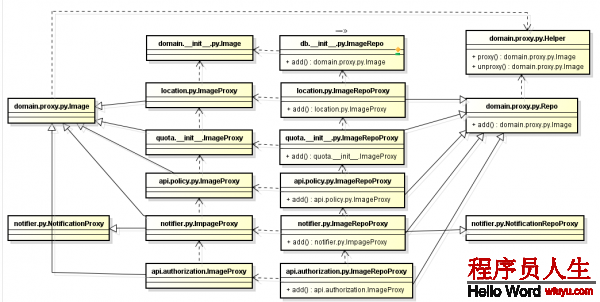
由上面的类图2,我们知道:image_repo = authorization.py/ImageRepoProxy, 输入参数image = authorization.py/ImageProxy
"""
image_repo.add(image)看图说话(类图见上面的图2):
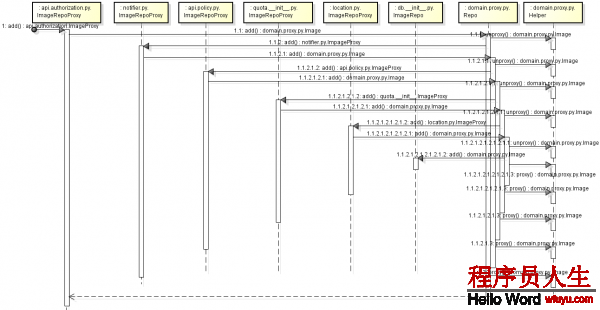
咋1看,该序列图和上面的很像吧!这就对了。可以看到add调用从最左侧的
glance/api/authorization.py/ImageRepoProxy1直到最深处(右数2)的glance/db/__init__.py/ImageRepo,首先调用unproxy完成解包,然后记录数据库条目(这个时候可以在Dashboard上看到状态为’已排队’),接着开始逐层往回(location.py/ImageRepoProxy到authorization.py/ImageRepoProxy)调用
glance/domain/proxy.py/Helper.proxy方法,和前述ImageFactoryProxy类1样,各ImageRepoProxy类也顺次完成 :权限检查、属性配额检查、策略检查和信息通知等,最后也是返回1个经过各个*ImageProxy层层封装的Image对象,以供后续使用。
小结:经过上面的分析,我们知道上传镜像进程中的第2个要求,主要完成权限检查,配额检查,策略检查,发布通知和记录数据库等操作。下面来看看镜像文件的上传进程。
根据前述glance CLI的debug日志及路由映照,我们可以很容易找到上传镜像文件的入口:
#glance/api/v2/image_data.py/ImageDataController.upload
@utils.mutating
def upload(self, req, image_id, data, size):
"""
req:是1个Request对象,包括该次要求的详细信息
image_id:在第2个要求进程中生成的镜像id,
u'079ed99f-e5f6⑷9b1⑻6b4⑹95b56e26bd9'
data: 1个Input对象,用来控制后面的镜像文件数据块上传
size:镜像大小,由于命令行中没有指定,这里为None
和前面1样self.gateway在__init__方法中实例化,指向glance/
gateway.py/Gateway。get_repo方法返回和前述类图2相同的对象
"""
image_repo = self.gateway.get_repo(req.context)
image = None
#省略try{ }except异常处理
#get方法与前述的add方法类似,首先从数据库取出image_id指向的条目,
#封装成`domain/__init__.py/Image`对象,然后经过层层封装返回
#`authorization/ImageProxy`对象
image = image_repo.get(image_id)
#更新镜像状态为saving - ‘保存中’
image.status = 'saving'
#省略try{ }except异常处理
#save方法与上面的get方法1样,逐层调用`ImageRepoProxy`完成相干的
#检查,通知,最后更新数据库条目状态(这个时候可以在Dashboard上看
#到状态为'保存中')
image_repo.save(image)
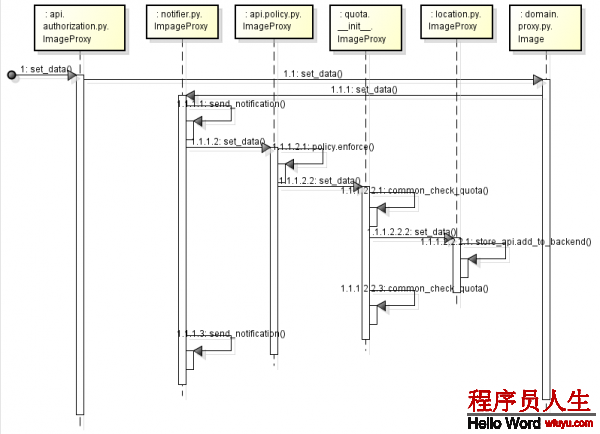
#和上面的save方法类似的处理方式,逐层调用`ImageProxy`的set_data
#,在该进程中会检查用户配额,发送通知,最后根据glance-api.conf文件
#中配置存储后端上传镜像文件(通过add方法)到指定地方存储
image.set_data(data, size)
#镜像上传成功后(在`location.py/set_data方法中上传文件成功后,
#修改状态为active),更新数据库状态为active(这个时候可以在
#Dashboard上看到状态为'运行中'),终究的信息是这样的:
"""
{
'status': 'active', 'name': None,
'checksum': 'd41d8cd98f00b204e9800998ecf8427e',
'created_at': datetime.datetime(2016, 6, 1, 2, 4, 32),
'disk_format': u'raw',
'locations': [{'url': 'rbd://1ee20ded-caae⑷19d⑼fe3-
5919f129cf55/images/079ed99f-e5f6⑷9b1⑻6b4-
695b56e26bd9/snap', 'status': 'active', 'metadata': {}}],
'properties': {},
'owner': u'25520b29dce346d38bc4b055c5ffbfcb',
'protected': False, 'min_ram': 0,
'container_format': u'bare', 'min_disk': 0,
'is_public': True, 'virtual_size': None,
'id': u'079ed99f-e5f6⑷9b1⑻6b4⑹95b56e26bd9', 'size': 0}
"""
image_repo.save(image, from_state='saving')函数说明请查阅上面的注解,save方法与add方法的处理进程很类似,读者可以根据前面add的序列图做进1步分析;下面只给出set_data的序列图:
至此,上传镜像的进程就分析完了。希望对大家有用。今天是61,在这里祝大家节日快乐!

上一篇 用pandas分析百万电影数据
下一篇 Qt 获取硬盘可用字节
程序员人生,我编程,我富裕,记住wfuyu网,php教程,php学习,php手册,CMS模版制作
声明:本站大部分内容是作者原创,少部分收集于互联网供大家一起学习,原版权很多不明,如有侵权请联系本站,谢谢!
粤ICP备14040726号-1 2015-2020 程序员人生 版权所有


