
猫猫分享,必须精品
素材代码地址:http://blog.csdn.net/u013357243/article/details/44976175
原文地址:http://blog.csdn.net/u013357243?viewmode=contents


1> 创建自定义Cell,继承自UITableViewCell
2> 根据需求,肯定控件,并定义属性
3> 用getter方法完成控件的实例化,只创建并添加到contentView,不处理位置
4> 定义1个模型属性,通过setter方法,设置cell的显示
设置大小由文字的长度决定
用字符串方法:[@"" boundingRectWithSize:(CGSize) options:(NSStringDrawingOptions) attributes:(NSDictionary *) context:(NSStringDrawingContext *)]

//boundingRectWithSize计算给定文字字符串所占的区域,返回是1个x,y为0的CGRect
//    如果要计算多行的准确高度需要传入
//        options:NSStringDrawingUsesLineFragmentOrigin

//attribbutes:dict 用于指定字体的相干属性的字典。UIKit框架的第1个头文件ps 这个头文件不记很难找
//    context :nil
#define kNameFont [UIFont systemFontOfSize:14]

    NSDictionary *nameDict = @{NSFontAttributeName:kNameFont};
CGRect nameFrame = [self.status.name boundingRectWithSize:CGSizeMake(MAXFLOAT, MAXFLOAT) options:NSStringDrawingUsesLineFragmentOrigin attributes:nameDict context:nil];要用到代理方法的:
-(CGFloat)tableView:(UITableView *)tableView heightForRowAtIndexPath:(NSIndexPath *)indexPath计算行高的方法,会在加载表格数据时,有多少行计算多少次 contentSize
 问题:此方法履行的时候,cell还没有被实例化!
 但是:行高计算是在实例化cell时,通过设置status属性,计算=》有了status模型,就能够知道行高  !

 问题:如何在cell实例化之前,取得行高?
 解决方法:通过status可以计算得到行高! = 》再建立1个模型,专门计算所有控件的位置
正告:file:///Users/apple/Desktop/%E5%AD%A6%E4%B9%A0/%E4%BA%8C%E6%9C%9F%E5%AD%A6%E4%B9%A0/Day07/%E6%96%B0%E6%B5%AA%E5%BE%AE%E5%8D%9AUI/%E6%96%B0%E6%B5%AA%E5%BE%AE%E5%8D%9AUI/Base.lproj/Main.storyboard: warning: Unsupported Configuration: Prototype table cells must have reuse identifiers
正告:原形单元格必须又1个可重用标示符
解决办法是在Cell中的Identfier加入可重用标示符

然后1定要关联cell的class

――这两部可以用1行代码来代替
//为tableView注册可重用单元格
    [self.tableView registerClass:[NYStatusCell class] forCellReuseIdentifier:ID];
这时候候我们注释
//    if (cell == nil) {
//        cell = [[NYStatusCell alloc]initWithStyle:UITableViewCellStyleDefault reuseIdentifier:ID];
//    }
也能够运行了
    在Storyboard中指定了可重用标示符,同时指定了Cell的类是NYStatusCell,系统会为tableView注册1个原形cell,专门用来做可重用单元格,1旦缓冲区不存在可重用单元格,系统会使用原形Cell新实例化1个Cell供程序使用!
因此如果在Storyb中,注册了原形Cell,就不需要做 cell == nil 的判断了
注意:这些在iOS6以后才有的。
这个小项目主要由这些类组成
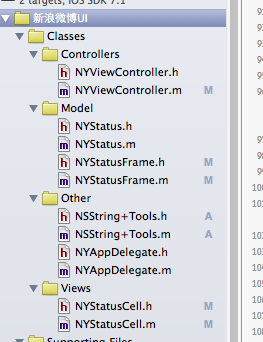
MVC各自负责各自的东西
Model有两个模型,1个是Status主要负责所有数据
Status中有
@property (nonatomic, copy)NSString *text;
@property (nonatomic, copy)NSString *icon;
@property (nonatomic, copy)NSString *name;
@property (nonatomic, assign)BOOL vip;
@property (nonatomic, copy) NSString *picture;
这些属性主要包括头像,昵称,vip图标,正文,图片
StatusFrame模型主要负责寄存每个组件在cell所要寄存的位置
//提高安全性能:+readonly
@property (nonatomic, assign, readonly)CGRect textF;
@property (nonatomic, assign, readonly)CGRect iconF;
@property (nonatomic, assign, readonly)CGRect nameF;
@property (nonatomic, assign, readonly)CGRect vipF;
@property (nonatomic, assign, readonly)CGRect pictureF;

/**行高*/
@property (nonatomic, assign)CGFloat cellHeight;

/**所有控件的尺寸都可以通过Status来计算得出*/
@property (nonatomic, strong)NYStatus *status;//ps:新建iOS交换学习群:304570962
可以加猫猫QQ:1764541256 或则微信znycat
让我们1起努力学习吧。
原文:http://blog.csdn.net/u013357243?viewmode=contents
// NYViewController.m
// 新浪微博UI
//
// Created by apple on 15⑷⑻.
// Copyright (c) 2015年 znycat. All rights reserved.
//
#import "NYViewController.h"
#import "NYStatus.h"
#import "NYStatusCell.h"
#import "NYStatusFrame.h"
@interface NYViewController ()
@property (nonatomic, strong) NSArray *statusFrames;
@end
@implementation NYViewController
static NSString *ID = @"Cell";
/**懒加载数据*/
-(NSArray *)statusFrames
{
if (_statusFrames == nil) {
_statusFrames = [NYStatusFrame statusFrames];
}
return _statusFrames;
}
-(void)viewDidLoad
{
[super viewDidLoad];
self.tableView.contentInset = UIEdgeInsetsMake(20, 0, 0, 0);
//为tableView注册可重用单元格
[self.tableView registerClass:[NYStatusCell class] forCellReuseIdentifier:ID];
}
- (void)didReceiveMemoryWarning
{
[super didReceiveMemoryWarning];
// Dispose of any resources that can be recreated.
}
#pragma mark - 数据源方法
-(NSInteger)tableView:(UITableView *)tableView numberOfRowsInSection:(NSInteger)section
{
return self.statusFrames.count;
}
-(UITableViewCell *)tableView:(UITableView *)tableView cellForRowAtIndexPath:(NSIndexPath *)indexPath
{
/**
在Storyboard中指定了可重用标示符,同时指定了Cell的类是HMStatusCell
系统会为tableView注册1个原形Cell,专门用来做可重用单元格的,1旦缓冲区中不存在
可重用单元格,系统会使用原形Cell新实例化1个Cell用程序使用!
因此如果在,Storyboard中,注册了原形Cell,就不再需要 cell == nil的判断了
*/
// NYStatusCell *cell = [tableView dequeueReusableCellWithIdentifier:ID];
// unable to dequeue a cell with identifier Cell - must register a nib or a class for the identifier or connect a prototype cell in a storyboard
// 使用这个方法,要求1定注册可重用单元格,否则就会崩溃!
// 官方建议使用以下方法,利用程序的崩溃,及时发现问题
NYStatusCell *cell = [tableView dequeueReusableCellWithIdentifier:ID forIndexPath:indexPath];
// if (cell == nil) {
// cell = [[NYStatusCell alloc]initWithStyle:UITableViewCellStyleDefault reuseIdentifier:ID];
// }
NYStatusFrame *statusFrame = self.statusFrames[indexPath.row];
cell.statusFrame = statusFrame;
return cell;
}
#pragma mark - 代理方法
/**计算单元格行高*/
-(CGFloat)tableView:(UITableView *)tableView heightForRowAtIndexPath:(NSIndexPath *)indexPath
{
/**
计算行高的方法,会在加载表格数据时,有多少行计算多少次 contentSize
问题:此方法履行的时候,cell还没有被实例化!
但是:行高计算是在实例化cell时,通过设置status属性,计算=》有了status模型,就能够知道行高 !
问题:如何在cell实例化之前,取得行高?
解决方法:通过status可以计算得到行高! = 》再建立1个模型,专门计算所有控件的位置
*/
NYStatusFrame *statusFrame = self.statusFrames[indexPath.row];
return statusFrame.cellHeight;
}
@end
//
//  NYStatusCell.m
//  新浪微博UI
//
//  Created by apple on 15⑷⑼.
//  Copyright (c) 2015年 znycat. All rights reserved.
//

#import "NYStatusCell.h"
#import "NYStatus.h"
#import "NYStatusFrame.h"


/**姓名字体*/
#define kNameFont [UIFont systemFontOfSize:14]
/**正文字体*/
#define kTextFont [UIFont systemFontOfSize:16]
@interface NYStatusCell()
//1>创建自定iyiCell,继承自UITableViewCell
//2>根据需求,肯定控件,并定义属性。
@property (nonatomic, strong) UIImageView *iconView;
@property (nonatomic, strong) UILabel *nameView;
@property (nonatomic, strong) UIImageView *vipView;
@property (nonatomic, strong) UILabel *textView;
@property (nonatomic, strong) UIImageView *pictureView;

@end

@implementation NYStatusCell

//3>用get方法完成控件的实例化,只创建并添加到contentView,不处理位置。
-(UIImageView *)iconView
{
    if (_iconView == nil) {
        _iconView = [[UIImageView alloc] init];
        [self.contentView addSubview:_iconView];
    }
    return _iconView;
}

-(UILabel *)nameView
{
    if (_nameView == nil) {
        _nameView = [[UILabel alloc] init];
        //默许字体是17号,改成kNameFont
        _nameView.font = kNameFont;
        [self.contentView addSubview:_nameView];
    }
    return _nameView;
}

-(UIImageView *)vipView
{
    if (_vipView == nil) {
        _vipView = [[UIImageView alloc] init];
        [self.contentView addSubview:_vipView];
    }
    return _vipView;
}

-(UILabel *)textView
{
    if (_textView == nil) {
        _textView = [[UILabel alloc] init];

        _textView.font = kTextFont;
        _textView.numberOfLines = 0;//让他可以换行
        [self.contentView addSubview:_textView];
    }
    return _textView;
}

-(UIImageView *)pictureView
{
    if (_pictureView == nil) {
        _pictureView = [[UIImageView alloc] init];
        [self.contentView addSubview:_pictureView];
    }
    return _pictureView;
}


-(void)setStatusFrame:(NYStatusFrame *)statusFrame
{
    _statusFrame = statusFrame;
    //1>设置数据
    [self settingData];

    //2>设置位置
    [self settingFrame];

}

/**设置数据*/
-(void)settingData
{
    NYStatus *status = self.statusFrame.status;
    //头像
    self.iconView.image = [UIImage imageNamed:status.icon];
    //姓名
    self.nameView.text = status.name;
    //vip
    if (status.vip) {
        self.vipView.image = [UIImage imageNamed:@"vip"];
    }
    //内容正文
    self.textView.text = status.text;
    //图片可选参数:
    if (status.picture.length > 0) {
        self.pictureView.hidden = YES;
        self.pictureView.image = [UIImage imageNamed:status.picture];
    }
    self.pictureView.hidden = NO;
}

/**设置位置*/
-(void)settingFrame
{


    //1.头像
    self.iconView.frame = self.statusFrame.iconF;

    //2,姓名大小由文字的长度决定
//boundingRectWithSize计算给定文字字符串所占的区域,返回是1个x,y为0的CGRect;w,h是计算好的宽高
//    如果要计算多行的准确高度需要传入
//        options:NSStringDrawingUsesLineFragmentOrigin

//attribbutes:dict 用于指定字体的相干属性的字典。UIKit框架的第1个头文件ps 这个头文件不记很难找
//    context :nil


    self.nameView.frame = self.statusFrame.nameF;

    //3,vip图片
    self.vipView.frame = self.statusFrame.vipF;

    //4,正文
    self.textView.frame = self.statusFrame.textF;

    //5,图片
    self.pictureView.frame = self.statusFrame.pictureF;

}


@endNYStatus
//
//  NYStatus.m
//  新浪微博UI
//
//  Created by apple on 15⑷⑻.
//  Copyright (c) 2015年 znycat. All rights reserved.
//

#import "NYStatus.h"

@implementation NYStatus


-(instancetype)initWithDict:(NSDictionary *)dict
{
    self = [super init];
    if (self) {
        [self setValuesForKeysWithDictionary:dict];
    }
    return self;
}

+(instancetype)statusWithDict:(NSDictionary *)dict
{
    return [[self alloc] initWithDict:dict];

}

+(NSArray *)statuses
{
    NSArray *array = [NSArray arrayWithContentsOfFile:[[NSBundle mainBundle] pathForResource:@"statuses.plist" ofType:nil]];
    NSMutableArray *arrayM = [NSMutableArray array];
    for (NSDictionary *dict in array) {
        [arrayM addObject:[self statusWithDict:dict]];
    }
    return arrayM;
}
@end
NYStatusFrame
//
//  NYStatusFrame.m
//  新浪微博UI
//
//  Created by apple on 15⑷⑼.
//  Copyright (c) 2015年 znycat. All rights reserved.
//

#import "NYStatusFrame.h"
#import "NYStatus.h"
#import "NSString+Tools.h"

#define kNameFont [UIFont systemFontOfSize:14]
/**正文字体*/
#define kTextFont [UIFont systemFontOfSize:16]

@implementation NYStatusFrame

/**
 为了程序的安全(面向对象的思想,你给我你就相信我,让我来改,他人别随意动)
 为了让程序更安全,我们将类NYStatusFrame的有关位置的:(例如iconF)设置成readonly只读属性,这时候候我们用self.iconF(_iconF的set方法)的时候就不能用了。
 此时要注意:
 1旦重写了readonly属性的getter方法,
        -(CGRect)iconF
        {
        }
        带_的成员变量就不存在了
        这时候候如果还需要使用_成员变量,则必须用合成指令@synthesize
                @synthesize iconF = _iconF;
 */


-(void)setStatus:(NYStatus *)status
{
    _status = status;
    //0.定义间距
    CGFloat padding = 10;

    //1.头像
    CGFloat iconX = padding;
    CGFloat iconY = padding;
    CGFloat iconW = 30;
    CGFloat iconH = 30;
    _iconF = CGRectMake(iconX, iconY, iconW, iconH);

    //2,姓名大小由文字的长度决定
    //boundingRectWithSize计算给定文字字符串所占的区域,返回是1个x,y为0的CGRect;w,h是计算好的宽高
    //    如果要计算多行的准确高度需要传入
    //        options:NSStringDrawingUsesLineFragmentOrigin

    //attribbutes:dict 用于指定字体的相干属性的字典。UIKit框架的第1个头文件ps 这个头文件不记很难找
    //    context :nil


    NSDictionary *nameDict = @{NSFontAttributeName:kNameFont};
//    CGRect nameFrame = [self.status.name boundingRectWithSize:CGSizeMake(MAXFLOAT, MAXFLOAT) options:NSStringDrawingUsesLineFragmentOrigin attributes:nameDict context:nil];
    CGRect nameFrame = [self.status.name textRectWithSize:CGSizeMake(MAXFLOAT, MAXFLOAT) attributes:nameDict];

    nameFrame.origin.x = CGRectGetMaxX(self.iconF) +padding;
    nameFrame.origin.y = padding + (self.iconF.size.height - nameFrame.size.height)*0.5;
    _nameF = nameFrame;

    //3,vip图片
    CGFloat vipX = CGRectGetMaxX(self.nameF) + padding;
    CGFloat vipY = self.nameF.origin.y;
    CGFloat vipW = 14;
    CGFloat vipH = 14;
    _vipF = CGRectMake(vipX, vipY, vipW, vipH);

    //4,正文
    NSDictionary *textDict = @{NSFontAttributeName:kTextFont};
//    CGRect textFrame = [self.status.text boundingRectWithSize:CGSizeMake(300, MAXFLOAT) options:NSStringDrawingUsesLineFragmentOrigin attributes:textDict context:nil];
    CGRect textFrame = [self.status.text textRectWithSize:CGSizeMake(300, MAXFLOAT) attributes:textDict];

    textFrame.origin.x = padding;
    textFrame.origin.y = CGRectGetMaxY(self.iconF) + padding;
    _textF = textFrame;

    //5,配图
    if (self.status.picture.length>0) {
        CGFloat pictureX = padding;
        CGFloat pictureY = CGRectGetMaxY(self.iconF) + padding +self.textF.size.height +padding;
        CGFloat pictureW = 100;
        CGFloat pictureH = 100;
        _pictureF= CGRectMake(pictureX, pictureY, pictureW, pictureH);
        self.cellHeight = CGRectGetMaxY(self.pictureF) + padding;
    }else{
        self.cellHeight = CGRectGetMaxY(self.textF) + padding;
    }

}

+(NSArray *)statusFrames
{
    NSArray *array = [NSArray arrayWithContentsOfFile:[[NSBundle mainBundle] pathForResource:@"statuses.plist" ofType:nil]];
    NSMutableArray *arrayM = [NSMutableArray array];
    for (NSDictionary *dict in array) {
        //要添加statusesFrame对象
        NYStatusFrame *statusFrame = [[NYStatusFrame alloc]init];
        //调用statusFrame的setter方法,保存status模型,同时计算出控件的位置(setter方法中进行的)
        statusFrame.status = [NYStatus statusWithDict:dict];
        //将statusFrame添加到数组
        [arrayM addObject:statusFrame];
    }
    return arrayM;
}
@end
ps:新建iOS交换学习群:304570962
可以加猫猫QQ:1764541256 或则微信znycat
让我们1起努力学习吧。
原文:http://blog.csdn.net/u013357243?viewmode=contents

程序员人生,我编程,我富裕,记住wfuyu网,php教程,php学习,php手册,CMS模版制作
声明:本站大部分内容是作者原创,少部分收集于互联网供大家一起学习,原版权很多不明,如有侵权请联系本站,谢谢!
粤ICP备14040726号-1 2015-2020 程序员人生 版权所有


