
AlertDialog的使用很普遍,在利用中当你想要用户做出“是”或“否”或其它各式各样的选择时,为了保持在一样的Activity和不改变用户屏幕,就能够使用AlertDialog.
https://github.com/JueYingCoder/AndroidUsefulExample_AlertDialog
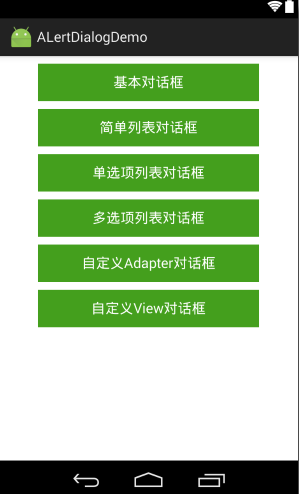
这篇文章主要讲授如何实现各种AlertDialog,文章比较长,如果能认真读完,AlertDialog的各种用法应当就可以掌握了,下面是我们今天要实现的终究效果:
乍1看,在利用中我们见过很多千奇百怪的对话框,但仔细分析,它还是有规律可循的,不外乎那几种,我们要学会从简易处着手,抽丝剥茧来掌握1项看起来仿佛很复杂的功能。只要我们理清了基本逻辑,其他的根据需要适当改造就能够为我们所用了!
AlertDialog基本的结构以下:
可以将对话框主要分为3个部份:上面区域是标题栏和图标,中间区域是内容区,下方是button区;其他情势各异的对话框也都是基于此的变体而已!
那末要创建1个对话框,我们需要做些甚么:
1,首先需要创建1个AlertDialog.Builder对象,基本语法:
AlertDialog.Builder alertDialogBuilder=new AlertDialog.Builder(this);
2,创建alertDialogBuilder对象后,通过调用它的create()方法就能够构造出1个对话框
AlertDialog alertDialog = alertDialogBuilder.create();
alertDialog.show();//将dialog显示出来
3,但是我们还有1个疑问,如何设置Dialog的其他属性呢,也就是说怎样控制标题,图表区域,内容区域和button区域,我们自但是然的想到的是1系列set方法;事实上真是如此,通过调用alertDialogBuilder对象的setXX方法来实现:
alertDialogBuilder.setTitle();//设置标题
alertDialogBuilder.setIcon();//设置图表

/*设置下方按钮*/
alertDialogBuilder.setPositiveButton();
alertDialogBuilder.setNegativeButton();
alertDialogBuilder.setNeutralButton();

/*对话框内容区域的设置提供了多种方法*/
setMessage();//设置显示文本
setItems();//设置对话框内容为简单列表项
setSingleChoiceItems();//设置对话框内容为单选列表项
setMultiChoiceItems();//设置对话框内容为多选列表项
setAdapter();//设置对话框内容为自定义列表项
setView();//设置对话框内容为自定义View

//设置对话框是不是可取消
setCancelable(booleab cancelable);
setCancelListener(onCancelListener);
综上:对AlertDialog的使用其实主要还是针对如何设置内容区域;
下面我们通过使用不同的内容区域的设置方法,实现几个经常使用的对话框;
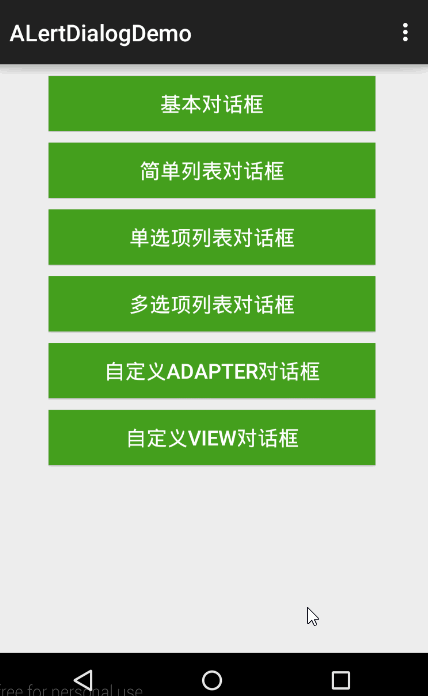
基本思路是在MainActivity中添加几个Button,点击后分别弹出对应的AlertDialog
步骤:
- 1 .创建Android Project->”AlertDialogDemo”
- 2 .编写activity_main.xml布局文件
- 3.编写所需strings.xml
- 4.编写MainActivity中各方法
限于篇幅的问题,现只贴出关键性部份代码,其余的请读者自行实现;
activity_main.xml
<LinearLayout xmlns:android="http://schemas.android.com/apk/res/android"
xmlns:tools="http://schemas.android.com/tools"
android:orientation="vertical"
android:layout_width="match_parent"
android:layout_height="match_parent" >

<Button
    android:id="@+id/btn_simple_dialog"
    android:text="@string/simple_dialog"
    android:textColor="#ffffff"
    android:textSize="18sp"
    android:background="#449F1D"
    android:layout_marginTop="10dp"
    android:layout_marginLeft="50dp"
    android:layout_marginRight="50dp"
    android:layout_width="match_parent"
    android:layout_height="wrap_content" />
<Button
    android:id="@+id/btn_simple_list_dialog"
    android:text="@string/simple_list_dialog"
    android:textColor="#ffffff"
    android:textSize="18sp"
    android:background="#449F1D"
    android:layout_marginTop="10dp"
    android:layout_marginLeft="50dp"
    android:layout_marginRight="50dp"
    android:layout_width="match_parent"
    android:layout_height="wrap_content" />
<Button
    android:id="@+id/btn_single_choice_dialog"
    android:text="@string/single_choice_dialog"
    android:textColor="#ffffff"
    android:textSize="18sp"
    android:background="#449F1D"
    android:layout_marginTop="10dp"
    android:layout_marginLeft="50dp"
    android:layout_marginRight="50dp"
    android:layout_width="match_parent"
    android:layout_height="wrap_content" />
<Button
    android:id="@+id/btn_multi_choice_dialog"
    android:text="@string/multi_choice_dialog"
    android:textColor="#ffffff"
    android:textSize="18sp"
    android:background="#449F1D"
    android:layout_marginTop="10dp"
    android:layout_marginLeft="50dp"
    android:layout_marginRight="50dp"
    android:layout_width="match_parent"
    android:layout_height="wrap_content" />
<Button
    android:id="@+id/btn_custom_adapter_dialog"
    android:text="@string/custom_adapter_dialog"
    android:textColor="#ffffff"
    android:textSize="18sp"
    android:background="#449F1D"
    android:layout_marginTop="10dp"
    android:layout_marginLeft="50dp"
    android:layout_marginRight="50dp"
    android:layout_width="match_parent"
    android:layout_height="wrap_content" />
<Button
    android:id="@+id/btn_custom_view_dialog"
    android:text="@string/custom_view_dialog"
    android:textColor="#ffffff"
    android:textSize="18sp"
    android:background="#449F1D"
    android:layout_marginTop="10dp"
    android:layout_marginLeft="50dp"
    android:layout_marginRight="50dp"
    android:layout_width="match_parent"
    android:layout_height="wrap_content" />
strings.xml
<resources>
<string name="app_name">ALertDialogDemo</string>

<!-- 主界面布局所需要的字符串资源-->
<string name="action_settings">Settings</string>
<string name="simple_dialog">基本对话框</string>
<string name="simple_list_dialog">简单列表对话框</string>
<string name="single_choice_dialog">单选项列表对话框</string>
<string name="multi_choice_dialog">多选项列表对话框</string>
<string name="custom_adapter_dialog">自定义Adapter对话框</string>
<string name="custom_view_dialog">自定义View对话框</string>

<!-- 对话框所需要的字符串资源-->
<string name="dialog_message">这里是内容区域</string>
<string name="postive_button">肯定</string>
<string name="negative_button">取消</string>

<!-- 对话框提示信息字符串资源-->
<string name="toast_postive">你点击了肯定按钮</string>
<string name="toast_negative">你点击了取消按钮</string>

<string name="text">自定义Adapter的内容</string>
</resources>
MainActivity.java
public class MainActivity extends ActionBarActivity implements View.OnClickListener{

//对应各个button
private Button simpleDiaog;
private Button simpleListDiaog;
private Button singleChoiceDiaog;
private Button multiChoiceDiaog;
private Button customAdateprDiaog;
private Button customViewDiaog;
//声明1个AlertDialog构造器
private AlertDialog.Builder builder;

@Override
protected void onCreate(Bundle savedInstanceState) {
    super.onCreate(savedInstanceState);
    setContentView(R.layout.activity_main);

    //实例化控件
    simpleDiaog= (Button) findViewById(R.id.btn_simple_dialog);
    simpleListDiaog= (Button) findViewById(R.id.btn_simple_list_dialog);
    singleChoiceDiaog= (Button) findViewById(R.id.btn_single_choice_dialog);
    multiChoiceDiaog= (Button) findViewById(R.id.btn_multi_choice_dialog);
    customAdateprDiaog= (Button) findViewById(R.id.btn_custom_adapter_dialog);
    customViewDiaog= (Button) findViewById(R.id.btn_custom_view_dialog);


    //监听点击事件
    simpleDiaog.setOnClickListener(this);
    simpleListDiaog.setOnClickListener(this);
    singleChoiceDiaog.setOnClickListener(this);
    multiChoiceDiaog.setOnClickListener(this);
    customAdateprDiaog.setOnClickListener(this);
    customViewDiaog.setOnClickListener(this);
}

/**
 *
 * 每一个button点击后弹出对应对话框,为了方便,各写1个showXXDialog()方法
 */
@Override
public void onClick(View view) {
    switch (view.getId()){
        case R.id.btn_simple_dialog:
            showSimpleDialog(view);
            break;
        case R.id.btn_simple_list_dialog:
            showSimpleListDialog(view);
            break;
        case R.id.btn_single_choice_dialog:
            showSingleChoiceDialog(view);
            break;
        case R.id.btn_multi_choice_dialog:
            showMultiChoiceDialog(view);
            break;
        case R.id.btn_custom_adapter_dialog:
            showCustomAdapterDialog(view);
            break;
        case R.id.btn_custom_view_dialog:
            showCustomViewDialog(view);
            break;
    }

}

@Override
public boolean onCreateOptionsMenu(Menu menu) {
    getMenuInflater().inflate(R.menu.menu_main, menu);
    return true;
}
}
上述代码都比较简单,现在我们真正关心的就是如何去具体实现showXXDialog;
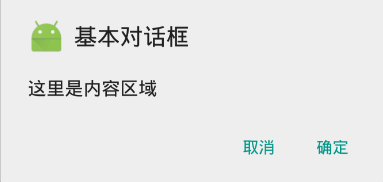
1.showSimpleDialog(): 根据我们前面所写的基本语法,我们可以很快写出下面这些代码,唯1需要注意的就是监听两个button,由于这是最基本也是最核心的AlertDialog,所以只要掌握了这个其他的alertDialog也就相对简单了;
//显示基本Dialog
private void showSimpleDialog(View view) {
    builder=new AlertDialog.Builder(this);
    builder.setIcon(R.mipmap.ic_launcher);
    builder.setTitle(R.string.simple_dialog);
    builder.setMessage(R.string.dialog_message);

    //监听下方button点击事件
    builder.setPositiveButton(R.string.postive_button, new DialogInterface.OnClickListener() {
        @Override
        public void onClick(DialogInterface dialogInterface, int i) {
            Toast.makeText(getApplicationContext(),R.string.toast_postive,Toast.LENGTH_SHORT).show();
        }
    });
    builder.setNegativeButton(R.string.negative_button, new DialogInterface.OnClickListener() {
        @Override
        public void onClick(DialogInterface dialogInterface, int i) {
            Toast.makeText(getApplicationContext(), R.string.toast_negative, Toast.LENGTH_SHORT).show();
        }
    });

    //设置对话框是可取消的
    builder.setCancelable(true);
    AlertDialog dialog=builder.create();
    dialog.show();
}
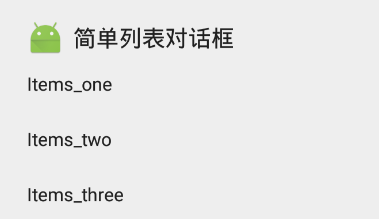
2,showSimpleListDialog():前面的代码很类似,唯1需要改变的就是将内容区域改成列表项:
    private void showSimpleListDialog(View view) {
    builder=new AlertDialog.Builder(this);
    builder.setIcon(R.mipmap.ic_launcher);
    builder.setTitle(R.string.simple_list_dialog);

    /**
     * 设置内容区域为简单列表项
     */
    final String[] Items={"Items_one","Items_two","Items_three"};
    builder.setItems(Items, new DialogInterface.OnClickListener() {
        @Override
        public void onClick(DialogInterface dialogInterface, int i) {
            Toast.makeText(getApplicationContext(), "You clicked "+Items[i], Toast.LENGTH_SHORT).show();
        }
    });
    builder.setCancelable(true);
    AlertDialog dialog=builder.create();
    dialog.show();
}
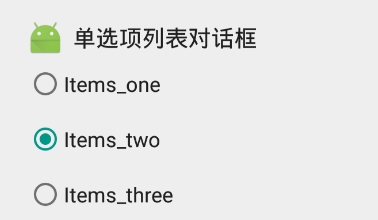
3,showSingleChoiceDialog():注意setSingleChoiceItems()内部各参数的意义
    private void showSingleChoiceDialog(View view) {
    builder=new AlertDialog.Builder(this);
    builder.setIcon(R.mipmap.ic_launcher);
    builder.setTitle(R.string.single_choice_dialog);

    /**
     * 设置内容区域为单选列表项
     */
    final String[] items={"Items_one","Items_two","Items_three"};
    builder.setSingleChoiceItems(items, 1, new DialogInterface.OnClickListener() {
        @Override
        public void onClick(DialogInterface dialogInterface, int i) {
            Toast.makeText(getApplicationContext(), "You clicked "+items[i], Toast.LENGTH_SHORT).show();
        }
    });

    builder.setCancelable(true);
    AlertDialog dialog=builder.create();
    dialog.show();
}
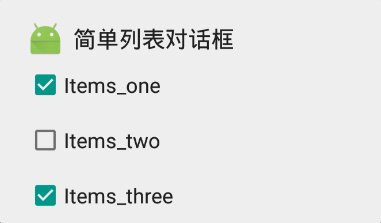
4,showMultiCHoiceDialog():
    private void showMultiChoiceDialog(View view) {
    builder=new AlertDialog.Builder(this);
    builder.setIcon(R.mipmap.ic_launcher);
    builder.setTitle(R.string.simple_list_dialog);

    /**
     * 设置内容区域为多选列表项
     */
    final String[] items={"Items_one","Items_two","Items_three"};
    builder.setMultiChoiceItems(items, new boolean[]{true, false, true}, new DialogInterface.OnMultiChoiceClickListener() {
        @Override
        public void onClick(DialogInterface dialogInterface, int i, boolean b) {
            Toast.makeText(getApplicationContext(),"You clicked "+items[i]+" "+b,Toast.LENGTH_SHORT).show();
        }
    });


    builder.setCancelable(true);
    AlertDialog dialog=builder.create();
    dialog.show();

}
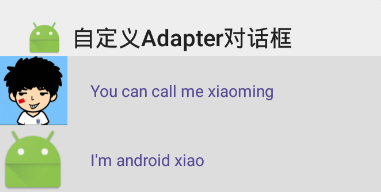
5,showCustomAdapterDialog():
这部份触及到自定义Adapter,如果对这部份不太了解,也不用灰心,在后面的文章中我会单独讲授Adapter这部份。在这里我们只需要了解自定义Adapter需要继承自BaseAdapter,然后需要覆写其中4个方法,其中getView()方法负责显示,所以我们还需要为它创建1个布局文件:
layout->custom_adapter.xml
<?xml version="1.0" encoding="utf⑻"?>
<LinearLayout xmlns:android="http://schemas.android.com/apk/res/android"
android:orientation="horizontal"
android:background="#dddddd"
android:layout_marginLeft="15dp"
android:layout_marginTop="15dp"
android:layout_marginBottom="10dp"
android:layout_marginRight="15dp"
android:layout_width="match_parent"
android:layout_height="wrap_content">
<ImageView
    android:id="@+id/id_image"
    android:layout_width="60dp"
    android:layout_height="60dp" />
<TextView
    android:textColor="#554995"
    android:id="@+id/id_text"
    android:layout_marginLeft="20dp"
    android:layout_gravity="center"
    android:layout_width="wrap_content"
    android:layout_height="wrap_content" />
然后我们在需要在MainActivity.java中实现我们自定义的Adapter类:
private class CustomAdapter extends BaseAdapter {

    private List<ItemBean> items;
    private LayoutInflater inflater;
    private ImageView image;
    private TextView text;

    public CustomAdapter(List<ItemBean> items, Context context) {
        this.items = items;
        this.inflater = LayoutInflater.from(context);
    }


    @Override
    public int getCount() {
        return items.size();
    }

    @Override
    public Object getItem(int i) {
        return items.get(i);
    }

    @Override
    public long getItemId(int i) {
        return i;
    }

    @Override
    public View getView(int i, View view, ViewGroup viewGroup) {
        if(view==null){
            view=inflater.inflate(R.layout.custom_adapter,null);
            image= (ImageView) view.findViewById(R.id.id_image);
            text= (TextView) view.findViewById(R.id.id_text);
        }
        image.setImageResource(items.get(i).getImageId());
        text.setText(items.get(i).getMessage());
        return view;
    }
}
我们在这里使用了List items;是由于Adapter中需要1张图片和String来填充我们刚定义好的layout;所以我们还需要在MainActivity中建立1个数据类:ItemBean:
private class ItemBean{
    private int imageId;
    private String message;

    public ItemBean(int imageId, String message) {
        this.imageId = imageId;
        this.message = message;
    }

    public String getMessage() {
        return message;
    }

    public int getImageId() {
        return imageId;
    }

    public void setImageId(int imageId) {
        this.imageId = imageId;
    }

    public void setMessage(String message) {
        this.message = message;
    }
}


    private void showCustomAdapterDialog(View view){

    builder=new AlertDialog.Builder(this);
    builder.setIcon(R.mipmap.ic_launcher);
    builder.setTitle(R.string.custom_adapter_dialog);

    /**
     * 设置内容区域为自定义adapter
     */
    List<ItemBean> items=new ArrayList<>();
    items.add(new ItemBean(R.mipmap.icon,"You can call me xiaoming"));
    items.add(new ItemBean(R.mipmap.ic_launcher, "I'm android xiao"));
    CustomAdapter adapter=new CustomAdapter(items,getApplicationContext());
    builder.setAdapter(adapter, new DialogInterface.OnClickListener() {
        @Override
        public void onClick(DialogInterface dialogInterface, int i) {
            Toast.makeText(getApplicationContext(),"You clicked"+i,Toast.LENGTH_SHORT).show();
        }
    });

    builder.setCancelable(true);
    AlertDialog dialog=builder.create();
    dialog.show();

}
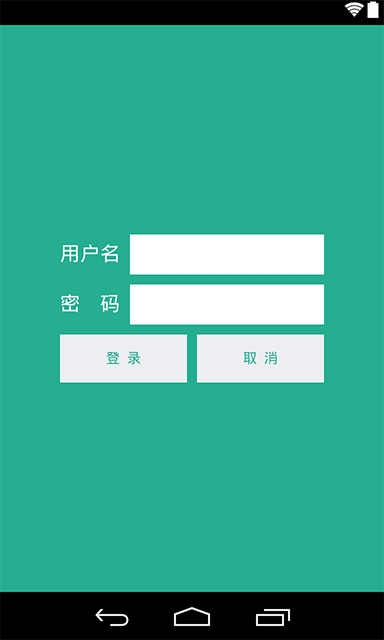
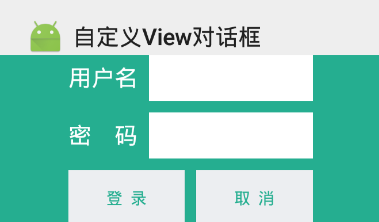
6,showCustomViewDialog()
为了实现自定义View的内容区域,我们首先需要建立1个布局文件:
layout->custom_view.xml
<?xml version="1.0" encoding="utf⑻"?>
<LinearLayout xmlns:android="http://schemas.android.com/apk/res/android"
android:layout_width="match_parent"
android:layout_height="match_parent"
android:orientation="vertical"
android:gravity="center"
android:background="#25AE90">
<LinearLayout
    android:orientation="horizontal"
    android:layout_width="match_parent"
    android:layout_height="wrap_content"
    android:layout_marginRight="60dp"
    android:layout_marginLeft="60dp">
    <TextView
        android:text="用户名"
        android:layout_marginRight="10dp"
        android:textSize="20sp"
        android:textColor="#ffffff"
        android:layout_width="wrap_content"
        android:layout_height="wrap_content" />
    <EditText
        android:layout_width="0dp"
        android:layout_weight="1"
        android:layout_height="40dp"
        android:background="#ffffff"/>
</LinearLayout>
<LinearLayout
    android:orientation="horizontal"
    android:layout_width="match_parent"
    android:layout_height="wrap_content"
    android:layout_marginTop="10dp"
    android:layout_marginRight="60dp"
    android:layout_marginLeft="60dp">
    <TextView
        android:text="密    码"
        android:layout_marginRight="10dp"
        android:textSize="20sp"
        android:textColor="#ffffff"
        android:layout_width="wrap_content"
        android:layout_height="wrap_content" />
    <EditText
        android:layout_width="0dp"
        android:layout_weight="1"
        android:layout_height="40dp"
        android:background="#ffffff"/>
</LinearLayout>
<LinearLayout
    android:orientation="horizontal"
    android:layout_width="match_parent"
    android:layout_height="wrap_content"
    android:layout_marginTop="10dp"
    android:layout_marginRight="60dp"
    android:layout_marginLeft="60dp">
    <Button
        android:text="登  录"
        android:textColor="#25AE90"
        android:background="#ECEEF1"
        android:layout_width="0dp"
        android:layout_marginRight="10dp"
        android:layout_weight="1"
        android:layout_height="wrap_content" />
    <Button
        android:text="取  消"
        android:textColor="#25AE90"
        android:background="#ECEEF1"
        android:layout_width="0dp"
        android:layout_weight="1"
        android:layout_height="wrap_content" />
</LinearLayout>
实现showCustomViewDialog()
    private void showCustomViewDialog(View view){
    builder=new AlertDialog.Builder(this);
    builder.setIcon(R.mipmap.ic_launcher);
    builder.setTitle(R.string.custom_view_dialog);

    /**
     * 设置内容区域为自定义View
     */
    LinearLayout loginDialog= (LinearLayout) getLayoutInflater().inflate(R.layout.custom_view,null);
    builder.setView(loginDialog);

    builder.setCancelable(true);
    AlertDialog dialog=builder.create();
    dialog.show();
}
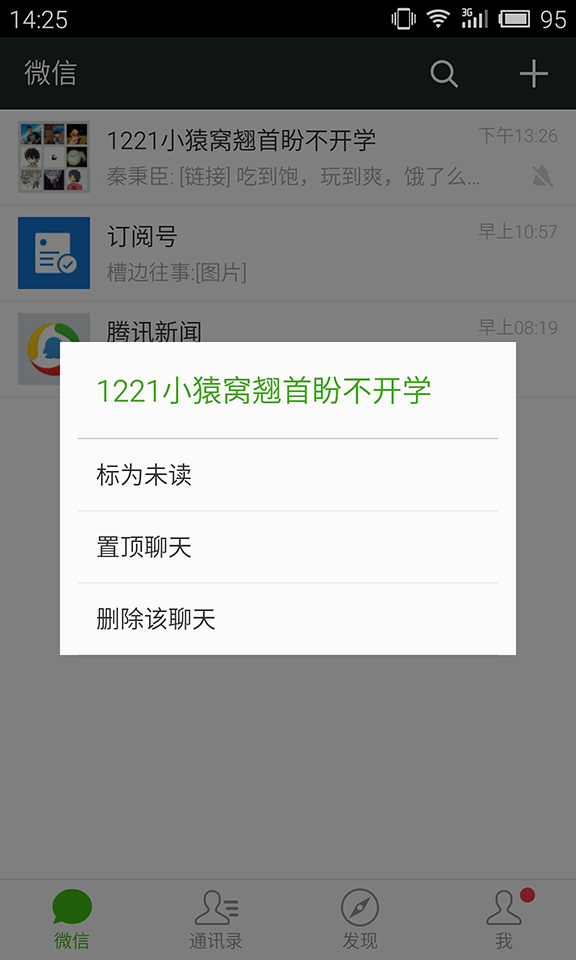
总结:
作为文章的结束;为了检验我们是不是已掌握了AlertDialog的各种用法,我们可以试着实现以下微信中的AlertDialog;如果你已掌握了自定义adapter和自定义ListView的话可以试着实现删除和置顶ListItem的功能。
Tips:编写自定义ListView,监听长按ListItem时弹出AlertDialog,并且实现点击删除能保证ListView中的Item删除掉,并且能够实现置顶功能

程序员人生,我编程,我富裕,记住wfuyu网,php教程,php学习,php手册,CMS模版制作
声明:本站大部分内容是作者原创,少部分收集于互联网供大家一起学习,原版权很多不明,如有侵权请联系本站,谢谢!
粤ICP备14040726号-1 2015-2020 程序员人生 版权所有


