Android Paint之ColorFilter详解
来源:程序员人生 发布时间:2016-07-28 09:23:29 阅读次数:2642次
尊重原创,转载请标明出处 http://blog.csdn.net/abcdef314159
在之前讲到Android Paint的使用详解的时候,其中setColorFilter(ColorFilter filter)方法没有讲,今天就来简单的分析1下,在Android中ColorFilter共有3个子类,ColorMatrixColorFilter,LightingColorFilter,PorterDuffColorFilter,今天先来看第1个ColorMatrixColorFilter,ColorMatrixColorFilter的构造方法很简单,1个是传入数组,1个是传入ColorMatrix类型的对象
public ColorMatrixColorFilter(ColorMatrix matrix) {
mMatrix.set(matrix);
update();
}
public ColorMatrixColorFilter(float[] array) {
if (array.length < 20) {
throw new ArrayIndexOutOfBoundsException();
}
mMatrix.set(array);
update();
}
这里主要来看1下ColorMatrix这个类,它内部有1个数组mArray,其实他保存的是1个4x5色彩矩阵,
* [ a, b, c, d, e,
* f, g, h, i, j,
* k, l, m, n, o,
* p, q, r, s, t ]
可以用来修改ARGB的值,其中 第1行决定红色R,第2行决定绿色G,第3行决定蓝色B,第4行决定了透明度A,第5列是色彩的偏移量
而图象的ARGB值存储在1个5*1的色彩份量矩阵中[R, G, B, A,1]。终究运算的结果是两矩阵相乘
R = a*R + b*G + c*B + d*A + e;
G = f*R + g*G + h*B + i*A + j;
B = k*R + l*G + m*B + n*A + o;
A = p*R + q*G + r*B + s*A + t;
我们看到mArray的大小为20,也就相当于1个4*5的数组,
private final float[] mArray = new float[20];
在初始化的时候,矩阵的数值会进行初始化
/**
* Set this colormatrix to identity:
* <pre>
* [ 1 0 0 0 0 - red vector
* 0 1 0 0 0 - green vector
* 0 0 1 0 0 - blue vector
* 0 0 0 1 0 ] - alpha vector
* </pre>
*/
public void reset() {
final float[] a = mArray;
Arrays.fill(a, 0);
a[0] = a[6] = a[12] = a[18] = 1;
}
其中第5列是偏移量,比如
[ 1 0 0 0 8
0 1 0 0 8
0 0 1 0 8
0 0 0 1 0 ]
表示个色彩份量计算完成以后要在加上8,其中最后1行是表示透明度的,1般不要修改。我们来演示1下
public class ColorFilterView extends View {
private Paint mPaint;
private Bitmap mBitmap;
private int padding = 12;
float[] colorMatrix = {
1, 0, 0, 0, 0, //red
0, 0, 0, 0, 0, //green
0, 0, 0, 0, 0, //blue
0, 0, 0, 1, 0 //alpha
};
private ColorMatrixColorFilter mLightingColorFilter= new ColorMatrixColorFilter(colorMatrix);
public ColorFilterView(Context context, AttributeSet attrs) {
super(context, attrs);
init();
}
private void init() {
mPaint = new Paint(Paint.ANTI_ALIAS_FLAG);
mBitmap = BitmapFactory.decodeResource(getResources(), R.drawable.icon);
}
@Override
protected void onDraw(Canvas canvas) {
super.onDraw(canvas);
for (int i = 0; i < 8; i++) {
mPaint.setColorFilter(mLightingColorFilter);
canvas.drawBitmap(mBitmap,
(i % 4) * (mBitmap.getWidth() + padding), (i / 4)
* (mBitmap.getHeight() + padding), mPaint);
}
}
}
看1下结果

再来修改1下
float[] colorMatrix = {
1, 0, 0, 0, 0, //red
0, 1, 0, 0, 0, //green
0, 0, 0, 0, 0, //blue
0, 0, 0, 1, 0 //alpha
};
看1下运行结果
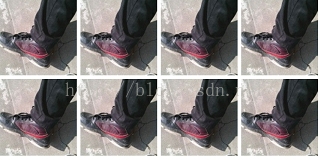
最后在修改1下,让他还原正常图片
float[] colorMatrix = {
1, 0, 0, 0, 0, //red
0, 1, 0, 0, 0, //green
0, 0, 1, 0, 0, //blue
0, 0, 0, 1, 0 //alpha
};
看1下结果
OK,上面的演示完了,我们看下面的1个矩阵。
[ 1 0 0 0 8
0 2 0 0 8
0 0 3 0 8
0 0 0 1 0 ]
他表示红色份量偏移8,绿色份量*2在偏移8,蓝色份量*3在偏移8。下面看1下主要的方法,setScale(float rScale, float gScale, float bScale, float aScale)
public void setScale(float rScale, float gScale, float bScale,
float aScale) {
final float[] a = mArray;
for (int i = 19; i > 0; --i) {
a[i] = 0;
}
a[0] = rScale;
a[6] = gScale;
a[12] = bScale;
a[18] = aScale;
}
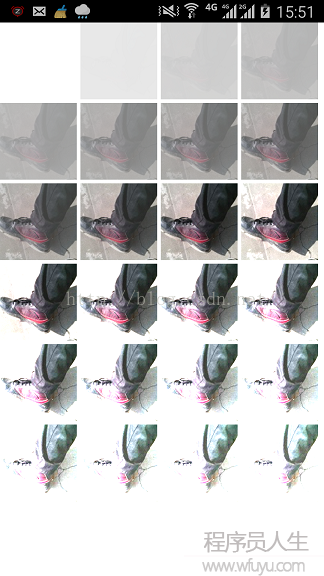
这个和矩阵刚初始化的时候差不多,不过这里的值不是1,是我们传入的值,代表的是亮度,我们看1下
public class ColorFilterView extends View {
private Paint mPaint;
private Bitmap mBitmap;
private ColorMatrix colorMatrix = new ColorMatrix();
private ColorMatrixColorFilter matrixColorFilter[] = new ColorMatrixColorFilter[24];
private int padding = 12;
public ColorFilterView(Context context, AttributeSet attrs) {
super(context, attrs);
init();
}
private void init() {
mPaint = new Paint(Paint.ANTI_ALIAS_FLAG);
mBitmap = BitmapFactory.decodeResource(getResources(), R.drawable.icon);
for (int i = 0; i < 24; i++) {
if (i < 8)
colorMatrix.setScale(i * .1f, i * .1f, i * .1f, i * .1f);
else if (i < 16)
colorMatrix.setScale(i * .1f, i * .1f, i * .1f, i * .1f);
else
colorMatrix.setScale(i * .1f, i * .1f, i * .1f, i * .1f);
matrixColorFilter[i] = new ColorMatrixColorFilter(colorMatrix);
}
}
@Override
protected void onDraw(Canvas canvas) {
super.onDraw(canvas);
for (int i = 0; i < 24; i++) {
mPaint.setColorFilter(matrixColorFilter[i]);
canvas.drawBitmap(mBitmap,
(i % 4) * (mBitmap.getWidth() + padding), (i / 4)
* (mBitmap.getHeight() + padding), mPaint);
}
}
}
我们看1下运行结果
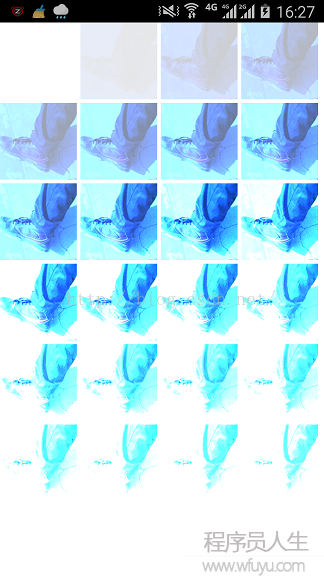
再来修改1下
for (int i = 0; i < 24; i++) {
if (i < 8)
colorMatrix.setScale(i * .1f, i * .3f, i * .9f, i * .1f);
else if (i < 16)
colorMatrix.setScale(i * .1f, i * .3f, i * .9f, i * .1f);
else
colorMatrix.setScale(i * .1f, i * .3f, i * .9f, i * .1f);
matrixColorFilter[i] = new ColorMatrixColorFilter(colorMatrix);
}
看1下运行结果
再看另外一个方法setRotate(int axis, float degrees),表示的是色相
/**
* Set the rotation on a color axis by the specified values.
* <p>
* <code>axis=0</code> correspond to a rotation around the RED color
* <code>axis=1</code> correspond to a rotation around the GREEN color
* <code>axis=2</code> correspond to a rotation around the BLUE color
* </p>
*/
public void setRotate(int axis, float degrees) {
reset();
double radians = degrees * Math.PI / 180d;
float cosine = (float) Math.cos(radians);
float sine = (float) Math.sin(radians);
switch (axis) {
// Rotation around the red color
case 0:
mArray[6] = mArray[12] = cosine;
mArray[7] = sine;
mArray[11] = -sine;
break;
// Rotation around the green color
case 1:
mArray[0] = mArray[12] = cosine;
mArray[2] = -sine;
mArray[10] = sine;
break;
// Rotation around the blue color
case 2:
mArray[0] = mArray[6] = cosine;
mArray[1] = sine;
mArray[5] = -sine;
break;
default:
throw new RuntimeException();
}
}
其中axis为0时表示的是红色份量旋转的角度,为1时是绿色份量旋转的角度,为2时是蓝色份量旋转的角度,
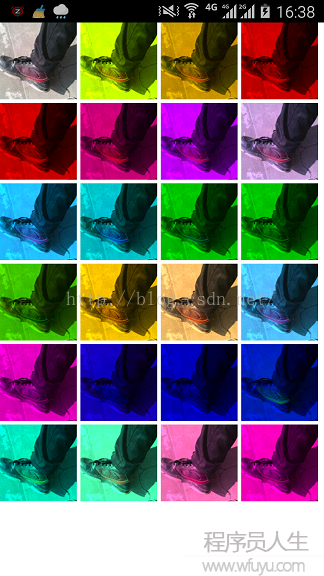
for (int i = 0; i < 24; i++) {
if (i < 8)
colorMatrix.setRotate(0, i*50);
else if (i < 16)
colorMatrix.setRotate(1, i*50);
else
colorMatrix.setRotate(2, i*50);
matrixColorFilter[i] = new ColorMatrixColorFilter(colorMatrix);
}
看1下运行结果
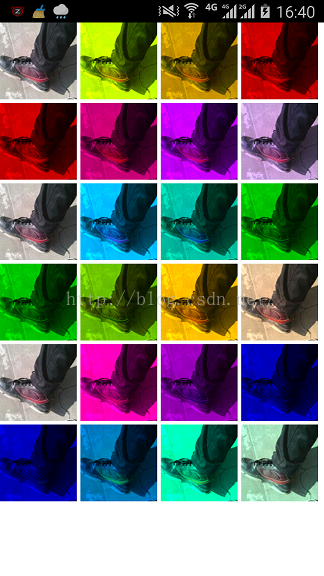
再来修改1下
for (int i = 0; i < 24; i++) {
if (i < 8)
colorMatrix.setRotate(0, i*50);
else if (i < 16)
colorMatrix.setRotate(1, (i%8)*50);
else
colorMatrix.setRotate(2, (i%8)*50);
matrixColorFilter[i] = new ColorMatrixColorFilter(colorMatrix);
}
看1下运行结果
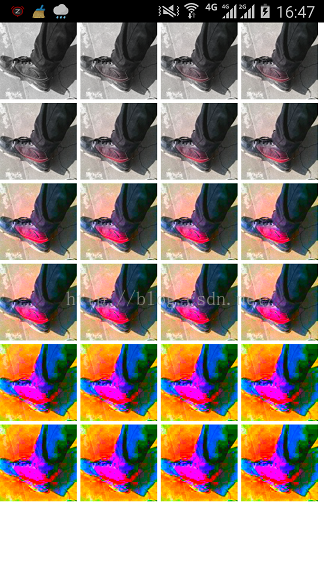
再看另外一个方法setSaturation(float sat),代表的是饱和度,其中0是灰色,1是正常
for (int i = 0; i < 24; i++) {
if (i < 8)
colorMatrix.setSaturation(i*.2f);
else if (i < 16)
colorMatrix.setSaturation(i*.5f);
else
colorMatrix.setSaturation(i*2f);
matrixColorFilter[i] = new ColorMatrixColorFilter(colorMatrix);
}
运行结果为
setConcat(ColorMatrix matA, ColorMatrix matB),两矩阵相乘
public void setConcat(ColorMatrix matA, ColorMatrix matB) {
float[] tmp;
if (matA == this || matB == this) {
tmp = new float[20];
} else {
tmp = mArray;
}
final float[] a = matA.mArray;
final float[] b = matB.mArray;
int index = 0;
for (int j = 0; j < 20; j += 5) {
for (int i = 0; i < 4; i++) {
tmp[index++] = a[j + 0] * b[i + 0] + a[j + 1] * b[i + 5] +
a[j + 2] * b[i + 10] + a[j + 3] * b[i + 15];
}
tmp[index++] = a[j + 0] * b[4] + a[j + 1] * b[9] +
a[j + 2] * b[14] + a[j + 3] * b[19] +
a[j + 4];
}
if (tmp != mArray) {
System.arraycopy(tmp, 0, mArray, 0, 20);
}
}
preConcat(ColorMatrix prematrix)前乘,postConcat(ColorMatrix postmatrix)后乘,调用的都是setConcat(ColorMatrix matA, ColorMatrix matB)方法,由于矩阵的乘法不具有交换律,改变两个矩阵的位置会产生不同的结果。
再来看ColorFilter的另外一个子类LightingColorFilter光线色彩过滤,就1个构造方法
public LightingColorFilter(int mul, int add) {
mMul = mul;
mAdd = add;
update();
}
mul表示色彩增加的倍数,add为色采增加,
public class ColorFilterView extends View {
private Paint mPaint;
private Bitmap mBitmap;
private LightingColorFilter mLightingColorFilter[] = new LightingColorFilter[8];
private int padding = 12;
public ColorFilterView(Context context, AttributeSet attrs) {
super(context, attrs);
init();
}
private void init() {
mPaint = new Paint(Paint.ANTI_ALIAS_FLAG);
mBitmap = BitmapFactory.decodeResource(getResources(), R.drawable.icon);
//不变
mLightingColorFilter[0] = new LightingColorFilter(0xFFFFFFFF,
0x00000000);
//去掉红色
mLightingColorFilter[1] = new LightingColorFilter(0xFF00FFFF,
0x00000000);
//去掉绿色
mLightingColorFilter[3] = new LightingColorFilter(0xFFFF00FF,
0x00000000);
//去掉蓝色
mLightingColorFilter[4] = new LightingColorFilter(0xFFFFFF00,
0x00000000);
//增加红色
mLightingColorFilter[5] = new LightingColorFilter(0xFFFFFFFF,
0x00560000);
//增加绿色
mLightingColorFilter[6] = new LightingColorFilter(0xFFFFFFFF,
0x00006400);
//增加蓝色
mLightingColorFilter[7] = new LightingColorFilter(0xFFFFFFFF,
0x00000056);
}
@Override
protected void onDraw(Canvas canvas) {
super.onDraw(canvas);
for (int i = 0; i < 8; i++) {
mPaint.setColorFilter(mLightingColorFilter[i]);
canvas.drawBitmap(mBitmap,
(i % 4) * (mBitmap.getWidth() + padding), (i / 4)
* (mBitmap.getHeight() + padding), mPaint);
}
}
}
运行结果为
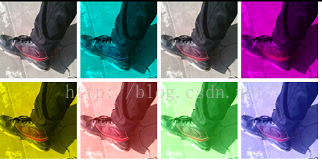
再来看ColorFilter的最后1个子类PorterDuffColorFilter,他也是只有1个构造方法
/**
* Create a color filter that uses the specified color and Porter-Duff mode.
*
* @param color The ARGB source color used with the specified Porter-Duff mode
* @param mode The porter-duff mode that is applied
*
* @see Color
* @see #setColor(int)
* @see #setMode(android.graphics.PorterDuff.Mode)
*/
public PorterDuffColorFilter(@ColorInt int color, @NonNull PorterDuff.Mode mode) {
mColor = color;
mMode = mode;
update();
}
我们看1下
public class ColorFilterView extends View {
private Paint mPaint;
private Bitmap mBitmap;
private int length = PorterDuff.Mode.values().length;
private PorterDuffColorFilter mLightingColorFilter[] = new PorterDuffColorFilter[length];
private int padding = 12;
public ColorFilterView(Context context, AttributeSet attrs) {
super(context, attrs);
init();
}
private void init() {
mPaint = new Paint(Paint.ANTI_ALIAS_FLAG);
mBitmap = BitmapFactory.decodeResource(getResources(), R.drawable.icon);
int i = 0;
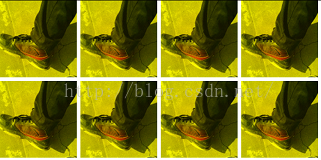
for (PorterDuff.Mode e : PorterDuff.Mode.values())
mLightingColorFilter[i++] = new PorterDuffColorFilter(Color.YELLOW,
e);
}
@Override
protected void onDraw(Canvas canvas) {
super.onDraw(canvas);
for (int i = 0; i < length; i++) {
mPaint.setColorFilter(mLightingColorFilter[i]);
canvas.drawBitmap(mBitmap,
(i % 4) * (mBitmap.getWidth() + padding), (i / 4)
* (mBitmap.getHeight() + padding), mPaint);
}
}
}
运行结果为
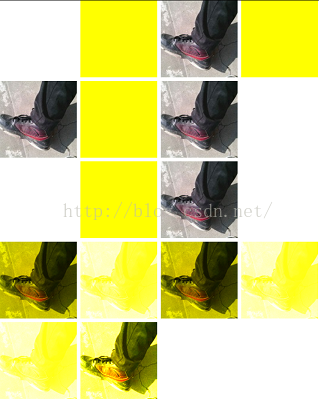
其中Mode是之前在讲到Android Paint的使用详解的时候讲到的18种混合模式,OK,到此为止,已分析终了。
生活不易,码农辛苦
如果您觉得本网站对您的学习有所帮助,可以手机扫描二维码进行捐赠


